One of the best exercises for you, whether you’re trying to build muscle or lose weight (or both) HAS to be the squat.
However, it’s also an exercise I see nearly EVERYBODY do incorrectly.
We do video form checks with every Online Coaching Client to make sure they’re squatting correctly, and we use a LOT of the same cues and instruction we cover in this guide!
So have no fear…
After reading this big ass squat guide (pun intended, I suppose?) – part of our Strength 101 series – you can start performing this compound exercise safely and effectively.
Click any link below or scroll down to read the whole guide:
- What are the benefits of doing squats?
- How to do a bodyweight squat.
- How to set up the squat rack for a barbell squat.
- How to do a barbell squat, step by step
- How do I bail out of a squat?
- 7 common mistakes when doing squats.
- How to improve your squat flexibility.
- Squat variations for beginners (box squat).
- How to perform a front squat.
- How to perform a one-legged squat (the pistol squat).
What Are the Benefits of Squats?
Squats are one of the most foundational functional movements in our lives. Let’s talk about the benefits and why you should be squatting all the time.
#1) We’re designed to squat: We’ve been squatting since we were babies, but as we get older and sit in unnatural positions all day, our squat form goes from perfect to terrible.
Crap.
In many countries, people often sit in a full squat for hours at a time.

From an evolutionary standpoint – it makes sense that we are genetically designed to, and can be really good at – squatting.
Before modern-day furniture and technology, you didn’t stop sitting in a full squat once you got older like we do today…you continued squatting your entire life.
That’s why squatting is one of the key moves for functional fitness.
#2) Squats are a compound movement that recruits most of our muscles – this means it’s a movement that uses multiple muscle groups and joints (your hip and knee joints) to complete.
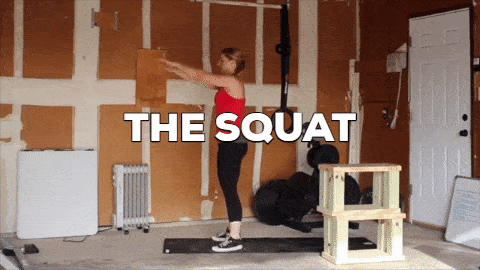
A simple bodyweight squat – which I’m demonstrating above – uses almost every muscle in the core and lower body.
If you add a dumbbell or barbell into the equation, I would even argue that they use every single major muscle group to complete.
In addition to every muscle in your “legs,” you need your:
- Hips
- Back
- Core
- Shoulders
- Arms.
Nothing is left out with this monster movement.
Because of the utilization of a large amount of muscle groups, squats cause your body to increase our anabolic hormone production, helping us lose fat and build muscle.[1]
#3) Squats will help strengthen your bones and your muscles (and your knees!), and can also increase flexibility.
Increasing the strength in your knees and hips (and entire body) reduces your chance of injury while doing both athletic movements and everyday life things (such as shoveling the driveway or standing up and sitting down).
And by learning to squat deeply, safely, you’re improving your range of motion and helping make you antifragile and protecting yourself against future injury.
Bazinga!

If your goals are to:
- Build muscle and get stronger, squats will get you there faster.
- Lose weight and get ‘toned,’ squats will get you there faster.
- Look better naked, squats will get you there faster.
- Get healthier and happier, squats will get you there faster.
- Feel like an absolute badass in the gym, squats will get you there faster.
In short, squats are amazing.
(See what I did there?)
My name is Staci Ardison, I’m a Senior Coach at Nerd Fitness, and my life has been absolutely transformed by barbell training, which is why I’m so excited to share this guide with you.
Back in 2011, I could barely pick up a pink dumbbell, and now I regularly compete in powerlifting competitions.
Here’s a scene of my homemade squat rack:
I am so excited to teach you how to squat today, as I’ve taught tons of coaching clients how to get started too.
Let’s start off by taking a look at the bodyweight squat – the first move you should master before you add weight.
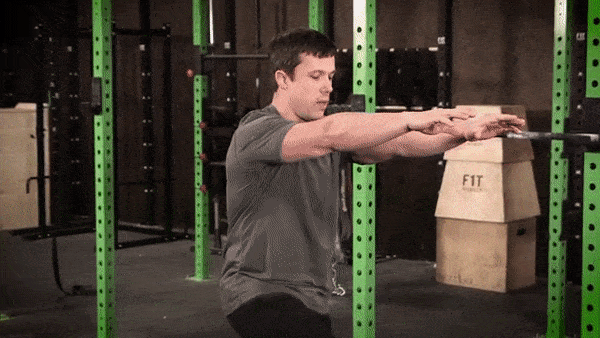
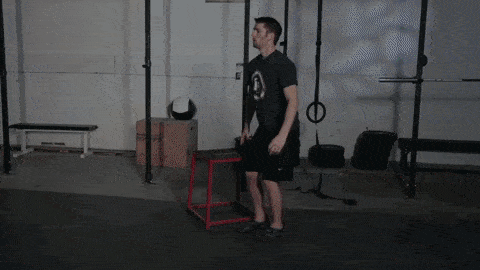
How to Do a Bodyweight Squat With Proper Form
The setup for the squat exercise is incredibly simple.
- Stand with your feet slightly wider than your hips.
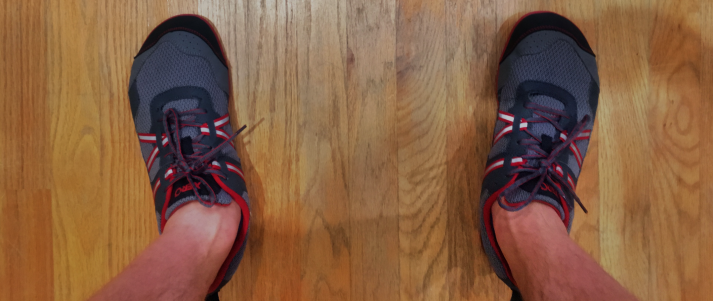
- Your toes should be pointed slightly outward – about 5 to 20 degrees outward (the wider your stance, the more you’ll want to rotate your feet outward).
- Look straight ahead and pick a spot on the wall in front of you.
- Look at this spot the entire time you squat, not looking down at the floor or up at the ceiling.
I go over the setup of a bodyweight squat and the full movement in this video:
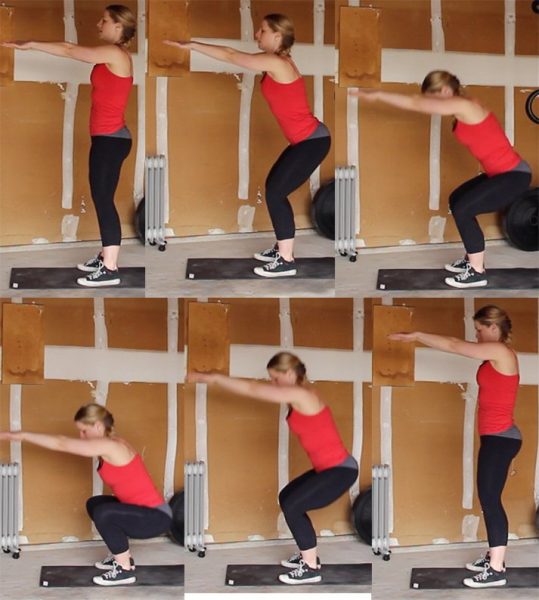
1) Put your arms straight out in front of you, parallel to the ground. Keep your chest up and proud, and your spine in a neutral position.
2) Your weight is on your feet – it should be on the heels and the balls of your feet, as if they were pasted to the ground. You should be able to wiggle your toes the entire movement (though that’s not a part of squatting!).
3) Keep your entire body tight the entire time, your core flexed like you’re bracing to be punched in the gut!
4) Breathe deeply into your stomach, break at your hip and push your butt back. Keep sending your hips backwards as your knees begin to bend.
It’s important to start with your hips back, and not by bending your knees.
5) As you squat down, focus on keeping your knees in line with your feet.
Many new lifters need to focus on pushing their knees out so they track with their feet.
When your knees start to come inside the toes, push them out (but not wider than your feet).[2]
Make sure your knees aren’t moving inward toward each other through the movement – this is very common.
6) Squat down until your hip joint is lower than your knees (what we call “parallel” in the squat game). Note: if you THINK you might not be squatting deep enough, you probably aren’t! However, it’s important to not FORCE yourself to go deeper in the squat if you don’t have the flexibility to do so yet. Aim for below parallel, but if you can’t get there yet, don’t sweat it.)
Once at the bottom, it’s time to stand back up from your squat:
7) Keeping everything tight, breathe out and drive through your heels (keep the balls of your feet on the ground as well).
8) Drive your knees outward (away from each other) the same way you did on the way down, and squeeze your butt at the top to make sure you’re using your glutes.
Here is a video from us nerds at Team Nerd Fitness (with instructions from Jim, lead trainer at our 1-on-1 Online Coaching Program) that will teach you good form on a bodyweight squat, including all the mistakes NOT to make:
Once you can do multiple sets of 15+ deep bodyweight squats with proper form, it’s time to move onto barbell squats!
If you are confident in doing bodyweight squats and want to work up to a barbell squat, follow our Gym Workout Level 4 Program, which includes dumbbell goblet squats, a good stepping stone to barbell squats:
The majority of the population has some sort of mobility issue (including myself!) that they are working on fixing.
We have LOTS of 1-on-1 coaching clients who are new to squatting, and it often comes down to ankle flexibility and hip mobility.
If you spend all day, every day, sitting in a desk chair, this might be you.
How to Set Up Properly For The Barbell Back Squat
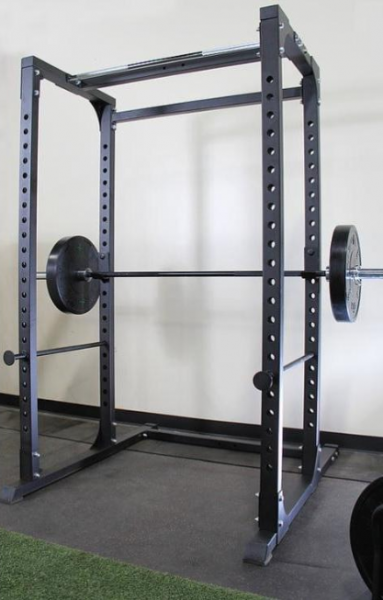
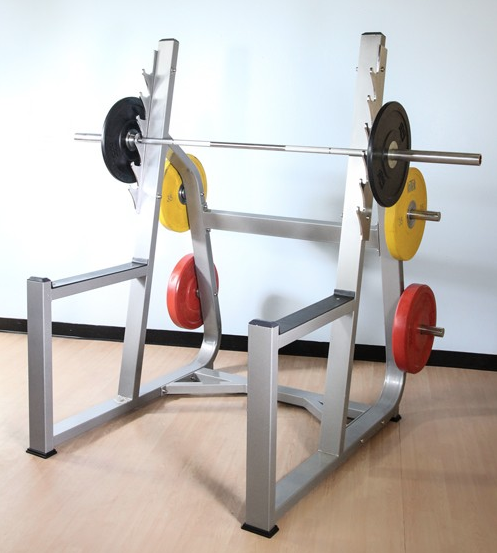
#1) Find your squat rack! It’ll look something like this, with an unattached barbell:
A. Squat Stand: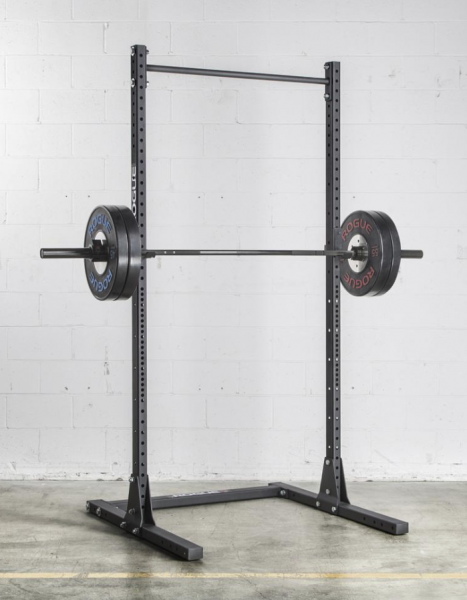
B. Power Cage/Squat Rack:
C. Half Rack (Least favorite*):
*I don’t like Half-racks without adjustable safety bars – if you want to squat deep the barbell might hit the immovable bars! Not cool. Aim for the A or B options if you have the choice!
Note: a squat rack is NOT the same thing as a Smith Machine, where the barbell is attached to the machine, and slides up and down two bars:
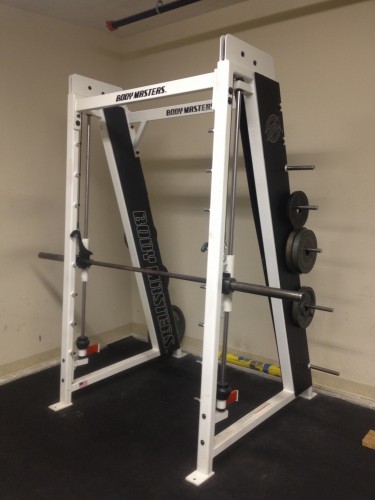
While a Smith Machine is a valid option for loaded squats, we recommend getting comfortable with a variation like a Goblet Squat or Barbell Squat first. Why?
Because the Smith Machine is on tracks, it forces a specific bar path when lifting. If you aren’t comfortable with your technique yet, this can cause some awkwardness with the lift and potentially put pressure in a spot you aren’t used to.
We like the free weight version because it gives you some more wiggle room to find the bar path that works best for YOU.
#2) Set the height of the bar to be about the same height as your collarbone.
Not sure how to set the height of the bar? I got you:
If your options are either too high or too low, it’s always best to set the pins slightly lower than you need them.
You don’t want to have to get up on your toes to rack/unrack the bar, especially as the weight gets heavier.
#3) Decide if you are going to do a high bar squat, or a low bar squat. Either is fine, but there IS a difference:
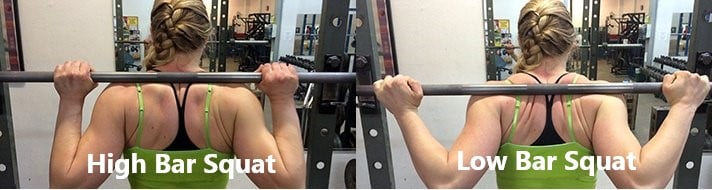
The “Low Bar Back Squat” is the most common form done by beginners, general lifters, and powerlifters.
It’s also the form taught in Starting Strength, one of the best books for beginners on the market.
So we’ll be focusing on that version for the rest of this section:
#4) Always squat with just the bar to start – as we discuss in “How much weight should I be lifting,” even if you’re planning on squatting 500 lbs, always start with just the bar!
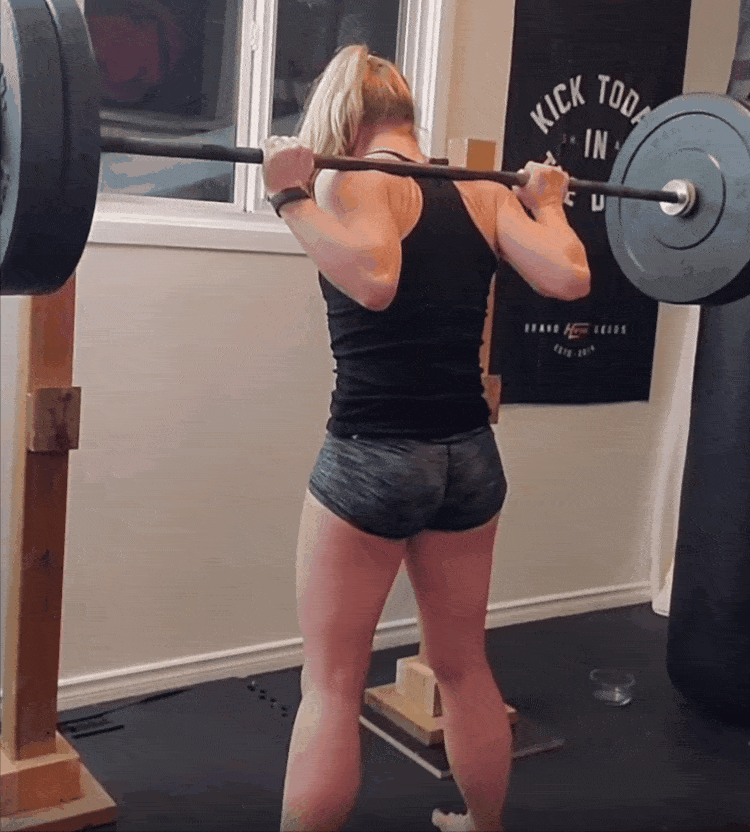
How to Do a Proper Barbell Back Squat, Step By Step
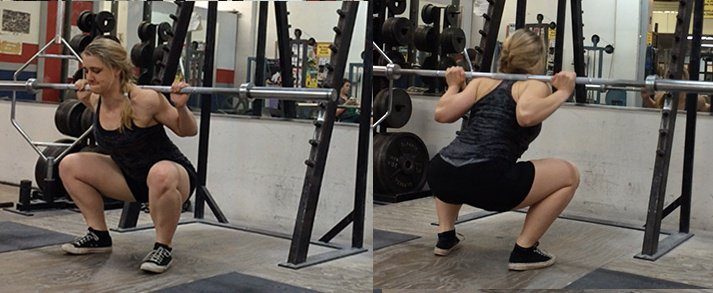
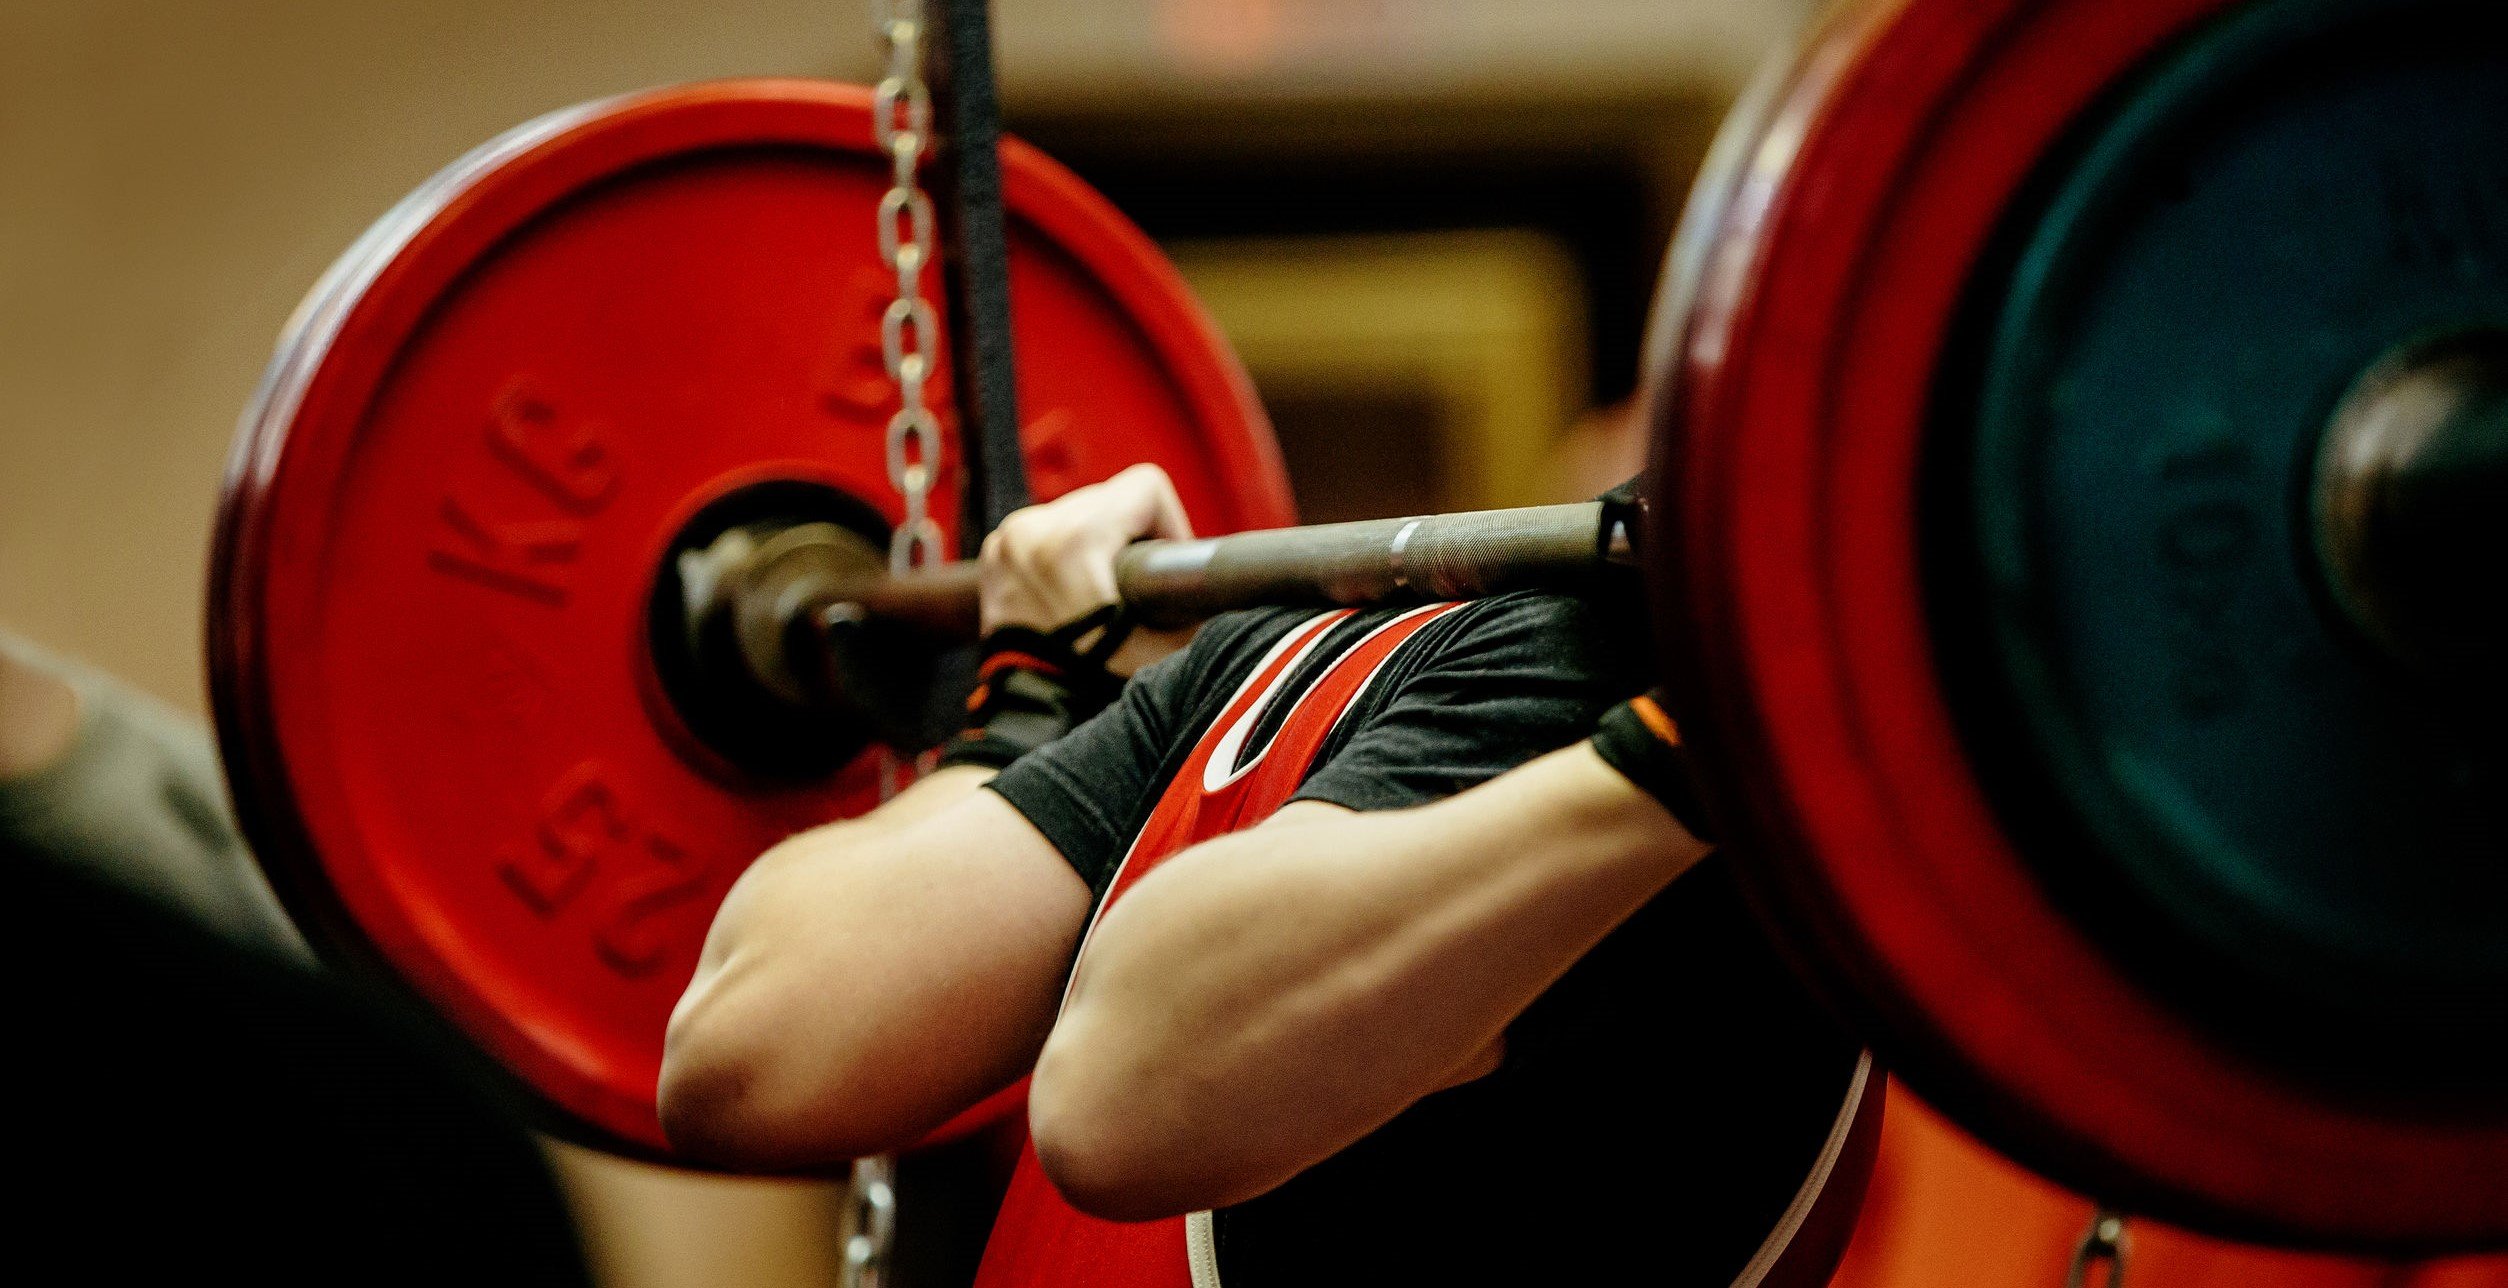
1) Facing the bar, step under it, and put your hands around it on either side of you.
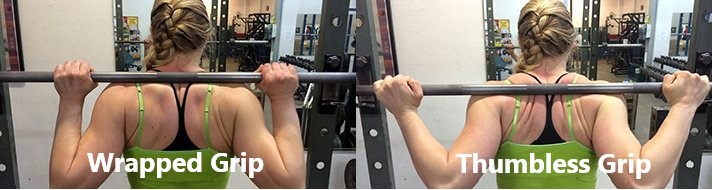
For this type of squat in our example, we are going to want a thumbless grip, so that our wrists are properly aligned with our forearms.
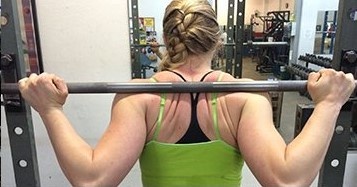
The width of your grip will be dependent on flexibility, but generally, a narrower (hands closer to your shoulers) grip will help create a meaty shelf for you to place the bar on the muscles in your upper back.
If you lack the flexibility for the narrower grip (which is super common), start out wider, then slowly bring it in as you get more flexible.
See the difference here between a “high bar, wrapped grip” (Left) and “low bar, thumbless grip” (right):
And now time to DO A BARBELL BACK SQUAT!
Definitely watch the video above and listen to the instructions, and then read this description when you need to restart:
- With the weight on your shoulders, step back from the supports.
- Your feet should be slightly wider than hip-width apart.
- Your toes should be slightly pointing outward.
- Flex your stomach, squeeze your glutes, inhale deeply into your stomach.
- Move your butt back, squat down slowly.
- Continue to drop until the tops of your legs are parallel or lower (the crease of your hip is below your waist).
- Explode back up to the starting position.
- After your set is complete, walk carefully forward to return the weight to the rack, and lower it down safely onto the supports.
- High-five yourself, you just did a barbell squat!
Not sure if you squatted deep enough?
Record yourself! 95% of the people I see doing squats in a gym don’t go deep enough!
Nervous about squatting correctly? Yes, I am a mind reader, and yes we can help you!
If you want an expert to check your squat form check out our 1-on-1 Coaching program. Our coaching app lets you record and send a video of your movement directly to your coach, who will provide specific feedback and build a custom program just for you.
How To Bail Out of a Squat Safely
If you are going to squat, you have to know how to “fail” at squatting safely! After all, there’s nothing scarier than being stuck in the bottom of a squat movement and not knowing how to get out of there!
A squat is very different from a barbell deadlift in that aspect: if you fail on a deadlift, you just don’t pick up the weight.
If you fail on a squat, you’re trapped under a bar…with potentially a lot of weight on it.
This can lead to SERIOUS injury. So please, learn how to bail out of a squat safely before you start attempting to do heavy barbell squats.
This will help give you the confidence to push yourself and get stronger!
7 Common Mistakes When Doing Squats
The squat is a basic movement, but those new to lifting often fall victim to a handful of common mistakes.
Let’s take a look at some of the big problems and how to fix it!
#1) Coming up on your toes with your knees forward during your squat
It’s important to keep your heels on the ground the entire time you’re squatting.
You should be driving down through your heels, and in order to do that, they need to be on the ground!
While some of your weight will be on the balls of your feet, you never want all of your weight to be on the balls of your feet or your toes.
You should be able to lift your toes up off the ground and wiggle them at any point and it shouldn’t change anything about your squat.
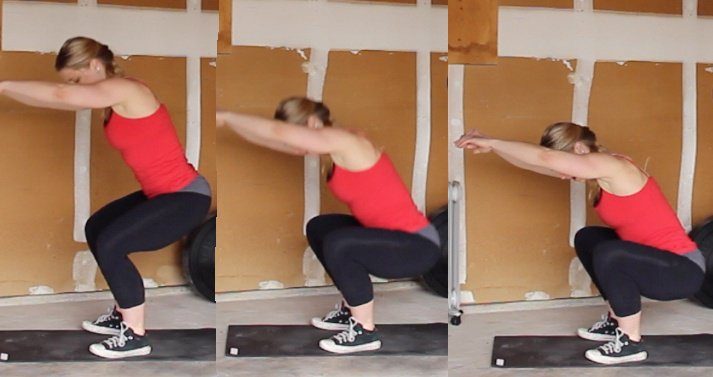
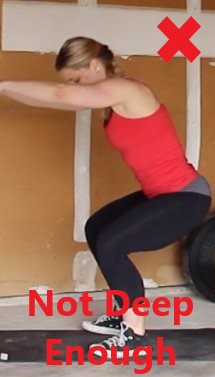
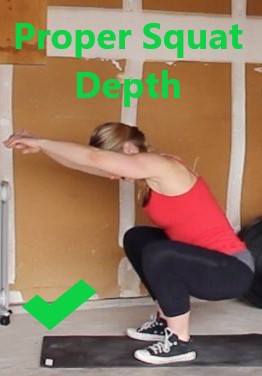
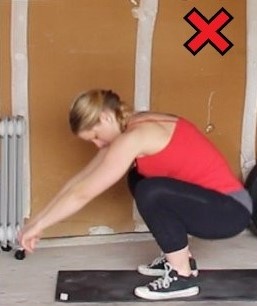
#2) Not going deep enough on your squats
Your squat should hit at least parallel (middle image above) – where your hip joint goes below the knee.
Depending on what you’re training for, you can go lower, but in order to maximize the muscles worked in the squat, it needs to be done to at least parallel or lower (you can see lower in the upper right image).
If you squat above parallel (a partial squat) you’re leaving the hamstrings out of the movement. This puts more pressure on the knee – the force put on your knee is actually reduced as you drop below parallel.
Unfortunately, there’s a lot of misunderstanding about squats and knee issues.
The deeper the squat, the more glutes that are activated as well.[3] This will result in more muscle being created from the squat, as shown by this infographic:

Now, a deeper squat is typically harder, both strength and flexibility-wise.
However, depending on your goals, squatting to parallel may make more sense.
If you’re struggling hitting depth there could be many causes – you could have poor ankle mobility, tight hip flexors and/or hamstrings, weak glutes, or poor pelvic alignment (among many other things). More on that in a minute.
#3) Knee Positioning
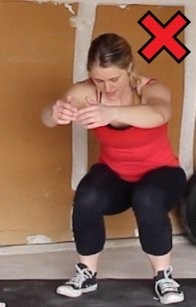
When you squat, you want your knees to track along with your toes.
This means if you are looking down at your knees and feet, your knees should be aligned at the same angle as your feet throughout the movement.
This infographic shows you the correct knee position for a squat:

Everyone’s exact positioning is going to be slightly different, but they should not be on the outside or the inside of the foot.
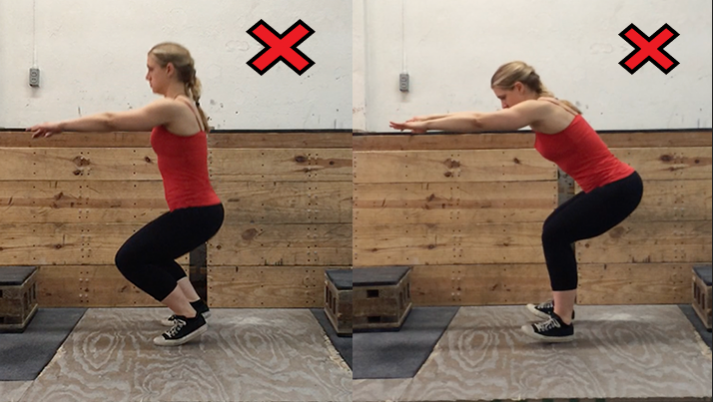
#4) Back Positioning
Your chest should be up and your shoulders should be back, like you’re King Kong about to pound your chest proudly.
Your body should stay in this position the entire time.
You don’t want your shoulders to round forward, but you also don’t want to hyperextend your back either.
Keeping your spine in a neutral position will help your spine safe and build a strong foundation throughout the heavy squat movement.
#5) Head Positioning
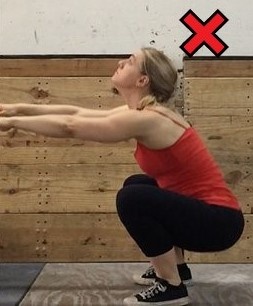
Many coaches will tell their lifters to look up, as that is the direction in which you want to be moving, but this is actually the last thing you want to do.
Take a second quick and look at the ceiling (I’ll wait! 🙂 ).
Now, see what position your neck vertebrae are in? That is a very unsafe position for your spine to be in, especially when more weight starts getting included in the equation.
You also don’t want to be looking directly at the floor.
Look straight out in front of you the entire time, with your head in a “neutral” position. Your chin should be in a position where you could hold a tennis ball between your chest and your chin.
#6) Attempting to keep your shins vertical.
Unless there is a current underlying knee issue that would cause additional pain – the shin can and should go past vertical in the squat. This will often allow a deeper squat which will build more strength and stability in the knee.
A forward lean in the shins is also present when we engage in any number of daily activities such as walking up steps or standing up from a chair. Squat as deep as you are able, but do not focus on holding a vertical shin.”
#7) Too much weight on the heels/on the outside or inside of feet during your squat
When trying to fix coming up on your toes, or your knee positioning, it is common for people to focus so much on keeping their weight on their heels that they forget to keep the balls of their feet on the ground!
Some of your weight will still be on the ball of your foot – if you are truly only having weight on your heels, it’s pretty hard to balance.
To the same effect, if the inside of your foot or the outside of your foot comes up off the floor, this is also not a good thing!
How do you know if you’re making these mistakes? Simple!
Record yourself doing squats.
I do.
And so does anybody else who is serious about improving their squats.
Often we look VERY different than we think we look when doing an exercise, so having a video of the movement is often the only way we can improve.
How to improve your squat flexibility
Several common mobility restrictions can limit your ability to squat with ease. Let’s tackle each of them in turn, and give you some simple drills you can do to start improving your mobility today.
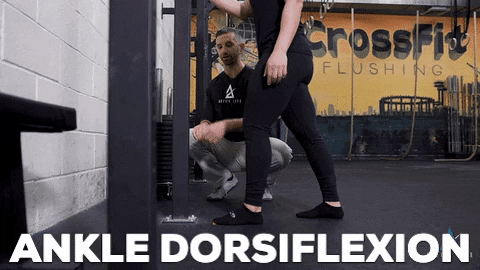
- Ankle Dorsiflexion – Ankle dorsiflexion refers to the movement where your foot moves towards your shin. Like this:

When dorsiflexion is restricted, squatting depth is also commonly limited. You’re likely to either a) feel like you’re falling backward as you try to squat down, or b) round your back at the bottom of your squat as your body fights to maintain balance.Here are a couple of quick tests to see if ankle dorsiflexion is a limiting factor for you:The 5-inch Wall Test – to perform this, take a knee (like you are about to propose) with your front foot 5 inches from the wall. Without letting your heel come off the ground, drive your knee forward and see if you can touch the wall. If you can’t, ankle dorsiflexion may be limiting your squat.The Heels-Elevated Test – another quick test is to elevate your heels 1-2″ on a stable surface (like sliding a textbook under each foot.) Try squatting again. If it feels immediately easier to get into a full-depth squat, ankles are likely at least PART of the equation.
So what is a nerd to do about limited ankle mobility? I’m so glad you asked. In this video, Coach Drew walks you through a quick 5-minute ankle mobility routine.
- Hip Internal Rotation – hip internal rotation is another big limiting factor in squatting to full depth.As you get close to parallel (when your hip and knee are at the same level), lack of hip internal rotation essentially results in your hip getting “stuck in the socket”, limiting further depth.You can check your range of motion with a simple test. Lie flat on your back. Bring one leg up so the knee is directly above the hip and bent at 90 degrees. Without shifting your hips and keeping your knee directly above your hip, rotate your leg so that your ankle moves away from your body.
You may find you have almost NO ability to move in this direction at all! It’s not uncommon to see people have 5-10 degrees of rotation. “Normal” rotation is considered to be 35-40 degrees!
And here’s a drill from Coach Matt to help you start to improve your range of motion today:
Note: with any mobility restrictions, improvements take time and repeated efforts. Go at your own pace and make sure you don’t force yourself to squat deeper than you are ready for!
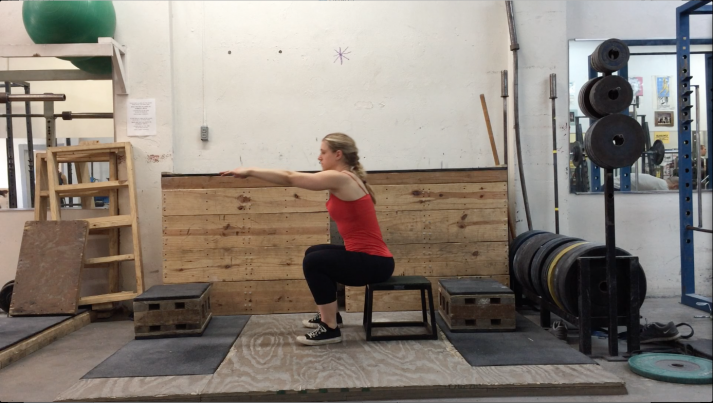
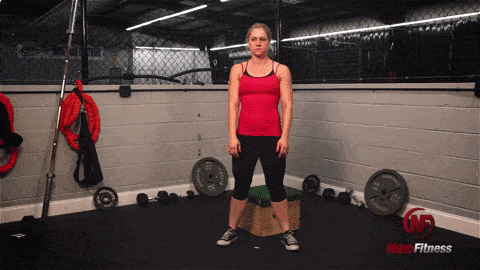
Squat Variations for Beginners (Box Squat):
In this section, we’re going to go over some squat variations to help you improve your form and build confidence before hitting the free weights section of the gym.
If you’re struggling to do a squat correctly, don’t fret!
I’m going to teach you about…
BOX SQUATS!
Squatting to a box will help teach you to sit back and keep your weight on your entire foot, instead of squatting with your knees forward and up on your toes.
Squatting back to a box is also great for people who have bad knees and can’t do bodyweight squats anymore.
You can do box squats with a barbell as well, but for this explanation, we’re just going to keep it simple with bodyweight box squats.
In order to do this, find a box or a chair that is the right height so when you sit on it, you are at parallel with your squat.
Your options include things like step stools, milk crates, or the smallest box at the gym (there’s usually a set of plyo boxes, and the shortest is around 10″.)
The lower the box, the more it will help you develop stronger hips and low back – the box at exactly parallel will help you more with quad strength.
Set up exactly as if you were going to do a regular bodyweight squat, only standing about a foot in front of the box.
1) Breathe in deeply, brace your core, move your butt back, and keep your knees in line tracking in the same direction as your toes, and squat back until you sit completely on the box.
Don’t plop back on the box, make it slow and deliberate while keeping your entire body tight.
2) Now, don’t move! Think about your positioning:
- Are your back and core still super tight?
- Is your weight on your heels and your midfoot?
- Is your head in a neutral position?
Great, now stand up by driving your hips upward, don’t let your weight shift forward and onto your toes (drive through your heels!), shoulders and chest up, knees out keeping them lined up with your toes.
For your first few, feel free to sit on the box while you evaluate your positioning, but as you get better at them, sit back and then quickly stand up again.
You know you’re doing a good squat when you can stand back up from the bottom of a squat position without having to lean forward and use momentum to get up.
You can squat, touch your butt to the box, and then stand back up without having to shift your weight around!
KEEP THAT BUTT BACK!
How to Perform a Front Squat
If you’re up for a similar-but-different squat, try…
The barbell front squat!

A front squat moves the weight from behind you to in front of you, which requires different muscles and mobility in different places.
I personally alternate front squats and back squats on my leg days.
Make sure you read our full guide on how to do a proper front squat.
I know all of this can be overwhelming, so the important thing is that you START! I realize I sound like a broken record at this point, but I really want you to begin strength training today.
How to Perform a One-Legged Squat (The Pistol Squat)
In the video above, Coach Jim shows you how to perform the one-legged squat, also known as the pistol squat.
To perform a one-legged squat:
- Squat down on one leg as low as you can go.
- Keep the heel flat on the ground and lift the other leg out in front of you.
It’ll look something like this:
If this is too much, work on performing an assisted one-legged squat.
Perform an assisted one-legged squat by holding onto a doorframe, squat rack, rings or another stable object, then squat down on one leg as low as you can go.
And there you have it.
And now, you have all the information you need to make them a staple part of your training program.
If you’d like to follow a tailor-made program designed around your life and goals, I want to plug our 1-on-1 Online Coaching Program one last time.
You’ll work with our certified NF instructors who will get to know you better than you know yourself, check your squat form, and program your workouts and nutrition for you.
Happy squatting!
-Staci
PS: Be sure to check out the rest of the Strength Training 101 series:
- Strength Training 101: How to Get Strong
- How to Find the Right Gym
- 6 Beginner Gym Workouts: A Beginners Guide to the Gym
- Beginner Strength Workouts
- How Much Weight Should I Be lifting?
- How to Do Inverted Rows
- How to Do a Front Squat
- How to Do The Bench Press
- How to Do The Overhead Press
- How to Do The Deadlift
PPS: I typed this whole article while sitting in a squat. Okay, no I didn’t, but that would have been cool.
###
photo source: Barbell Squat, spotpoint74 © 123RF.com, power rack, squat stand, squat rack, Otmar Winterleitner © 123RF.com