Let’s start training with resistance bands!
Whether you got exercise bands in the mail from Amazon, or they’ve been sitting in your closet since the 80s, you’ve finally decided it’s time to learn how to use the darn things.
Either way, you’re in the right place!
That’s because we specialize in home workouts. Our Coaches build custom training programs for whatever equipment you might have available (or even “no equipment”).
If you have a set of resistance bands, today we’ll show you how to put them to good use.
Here’s what we’ll cover:
- The Nerd Fitness Resistance Band Workout (with video tutorial)
- The 10 best resistance band exercises
- What are the best resistance bands? (Types and product recommendation)
- How to use resistance bands (5 tips and tricks)
- How to do assisted exercises with a resistance band.
- Can you lose weight with resistance bands? (Weight Loss 101)
- When should I do a resistance band workout? (Next steps)
It’s time to join the Resistance…

…band movement.[1]
The Nerd Fitness Resistance Band Workout (With Video Tutorial)
After you watch the video above (featuring Matt Shortis, a lead trainer in our 1-on-1 Online Coaching Program), here’s a quick recap with the repetitions of the workout here:
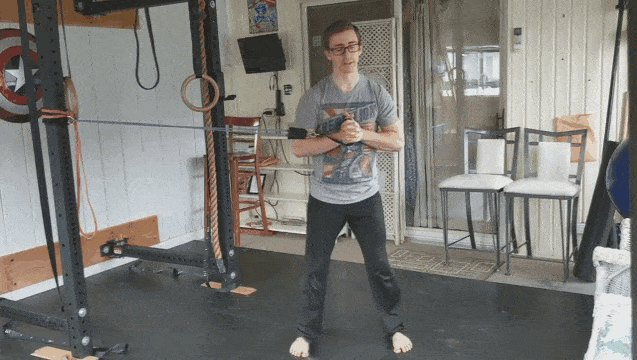
RESISTANCE BAND WARM-UP:
- 10 Band Over and Backs
- 10 Vertical Band Pull Aparts
- 10 Horizontal Pull Aparts
THE NERD FITNESS RESISTANCE BAND WORKOUT:
- 12 Band Squats
- 10 Overhead Presses
- 12 Band Deadlifts
- 10 Arm Rows (per side)
- 10 High to Low Band Rows
- 10 Arm Chest Presses (per side)
- 10 Pallof Presses (per side)
This Beginner Resistance Band Workout is what’s called a circuit (you can learn all about circuit training here).
That’s just a fancy term for doing a workout like so:
- 1 set of exercise A, go immediately to
- 1 set of exercise B, go immediately to
- 1 set of exercise C, and so on…
- Repeat from the top!
Your long-term goal should be to do 3 full circuits back to back for a complete workout.
If you can only go through it once or twice, that’s okay too!

And if you need to take a break at any time between sets or after a circuit, do it! You do you.
Whatever you do, don’t skip your warm-up. Even if you don’t do the sequence above, make sure you get your heart rate up a little before jumping in.
Here’s another short sequence you can do to warm up:
Next, let’s go over each move covered in our resistance band workout (and warm-up) in detail.
The 10 Best Resistance Band Exercises
Here’s each exercise covered in the Beginner Resistance Band Workout:
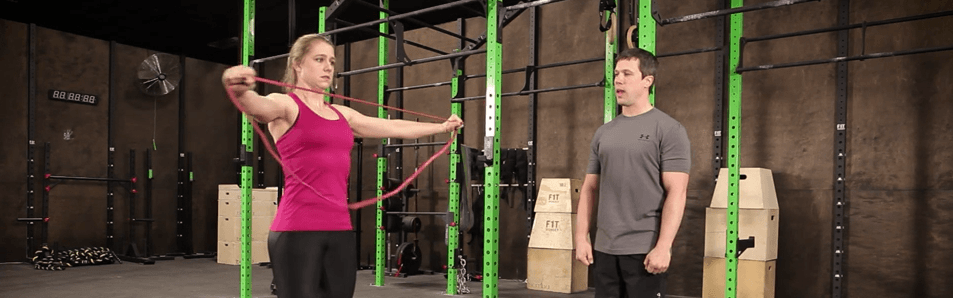
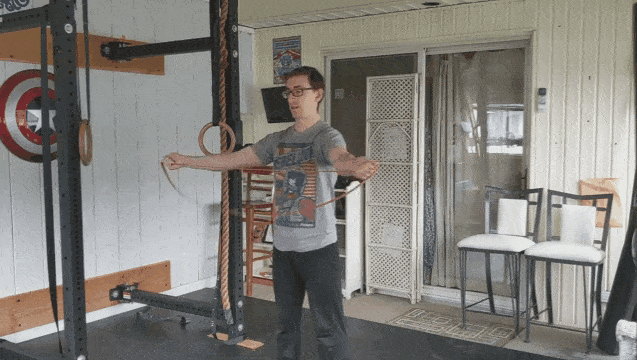
#1) BAND OVER AND BACK
- Grab the band in front of you, with both hands, about shoulder-width apart. Start at about waist height.
- Pull the bands apart.
- While keeping your arms and elbows straight, lift upward, eventually reaching above and over your head.
- Continue this motion down your back, keeping your arms as straight as you can.
- When your shoulders won’t let you come down any further, reverse the movement and come all the way back to your starting position.
- Repeat.
Tip from Coach Matt: If it’s too difficult to keep your arms straight, loosen and widen your grip on the band so it becomes less taut.
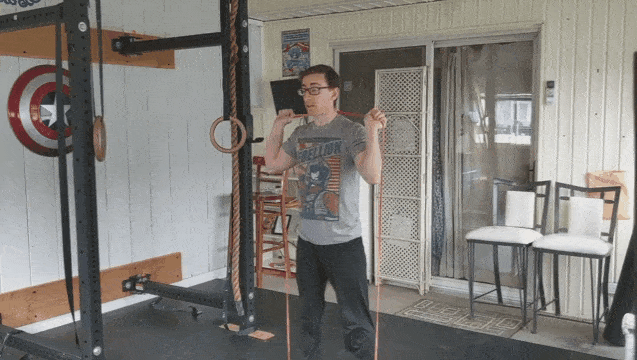
#2) OVERHEAD BAND PULL-APART

- Start with the band overhead, gripping a little wider than shoulder-width apart.
- Bring the band down by slowly pulling apart, pinching the shoulder blades as you go.
- The arms will sink until about shoulder height.
- Pause, then slowly rise back up.
- Repeat.
Tip from Coach Matt: Resist the urge to have the resistance band “snap” you back up. Do this by slowly controlling the movement.
#3) HORIZONTAL BAND PULL APART
- Grab the resistance band about shoulder-width apart and place it right in front of you, about chest height.
- Pull the band apart, pinching your shoulder blades back as you go.
- Slowly reverse to your starting position.
- Repeat.
Tip from Coach Matt: Make sure you stand up straight during this movement. Over time this exercise will help improve your posture.
#4) BAND SQUATS
- Step on the band, about shoulder-width apart.
- Pull the resistance band up so the top reaches above your shoulder, with the band resting on the back of your arm.
- Complete a squat, by having your hips push back while your chest stays up.
- Reverse the movement to come back down, making sure to keep your heels down.
- Repeat.
Tip from Coach Matt: If this seems too easy, you could use two exercise bands, increasing the resistance.
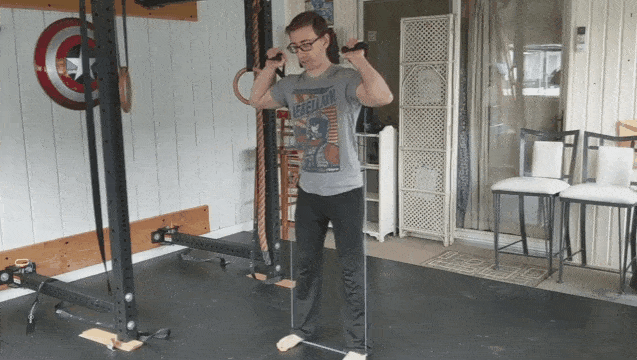
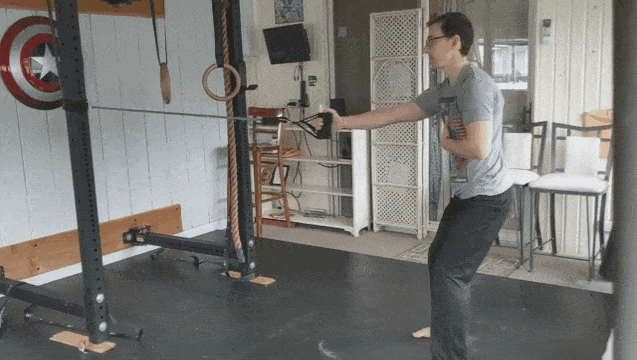
#5) BAND OVERHEAD PRESS
- Step on the band, about shoulder-width apart.
- Pull the resistance band up so the top reaches above your shoulder, with the band resting on the back of your arm (just like in your band squat).
- While holding the band with palms faced forward, press your arms upward as you would in a normal overhead press. Keep your vision forward during the press.
- Reverse to bring the band back down.
- Repeat.
Tip from Coach Matt: Stand up straight and push up as tall as you can. Reach high during the movement and try to take up space.
#6) BAND DEADLIFT
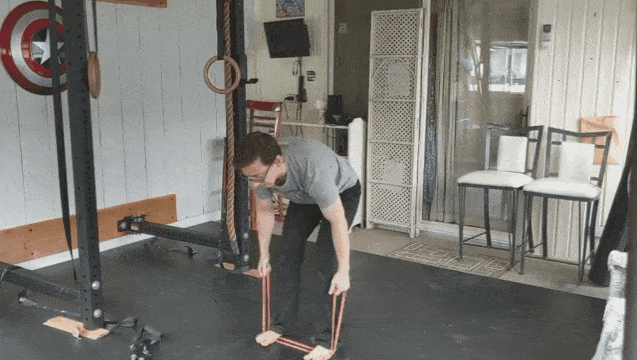
- Step on the band, about shoulder-width apart.
- Push your hips back to lower and grab the band. Your palms should be facing each other and your shins should be mostly vertical.
- While holding the band, hinge your hips forward like you would in a normal deadlift to stand up.
- When standing, push your hips back, lowering back down.
- Repeat.
Tip from Coach Matt: Make sure you pull with your arms during the movement, which will engage your back.
#7) BAND ONE-ARM ROW
- Anchor your band on a sturdy door or pole.
- Stand in a quarter squat position and place the non-pulling arm across your lower chest for support.
- With the other arm, pull the band back until your elbow reaches the side of your torso. Don’t flare out your arm during the movement, instead, keep it tucked along your obliques.
- Slowly release the band back to your starting position.
- Repeat.
Tip from Coach Matt: Keep your chest up and tall. You want the band to pull with your arm, not your entire body (resist the urge to rotate your torso).
#8) HIGH TO LOW BAND ROW
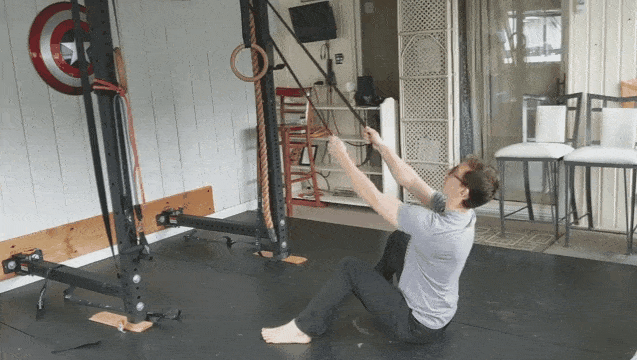
- Anchor your band to a pull-up bar or the top of a sturdy door.
- Sit on the floor, with your legs flared out. Lean back ever so slightly and grab the resistance band with both hands (it should have a little bit of tension at the top of the movement).
- To pull the band down, drive both elbows back towards your torso.
- Reverse the movement to release tension in the band.
- Repeat.
Tip from Coach Matt: Keep your chest up, towards the anchor point of the resistance band.
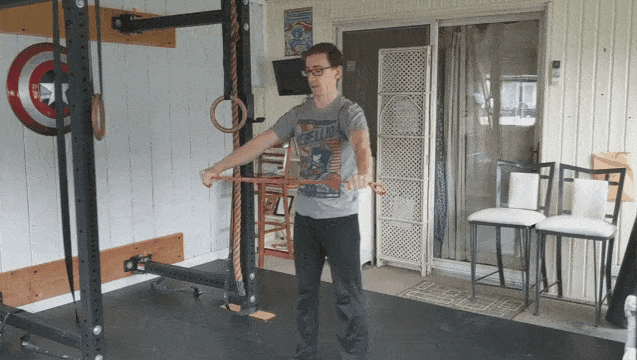
#9) SINGLE-ARM BAND CHEST PRESS
- Anchor your band to a sturdy door or a structurally sound pole.
- Begin with one leg in front (the opposite of the side you’re pushing with), then grab the band with one arm.
- Start with your elbow close to your torso and push your arm forward. You’ll rotate your torso a little to complete the movement.
- To reverse, slowly pull your elbow back to its starting position.
- Repeat.
Tip from Coach Matt: Make sure the band has some tension in it during the start. You want resistance from the band during the entire movement.
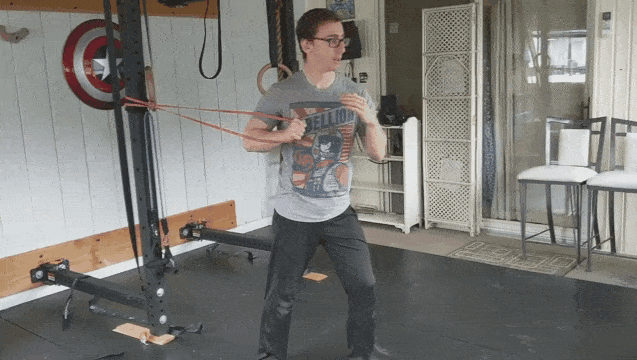
#10) PALLOF PRESS
- Anchor your band to a sturdy door or a structurally sound pole.
- Have the side of your body face your anchor, then pull the band in front of you until you have some tension.
- Holding the band with both hands from the center of your chest, push straight out. Pretend there’s an arrow coming directly from your chest, like the Care-Bear Stare.
- When returning, keep your elbows down and to your side.
- Repeat.
Tip from Coach Matt: The point of this exercise is to feel it along the obliques (side torso), so make sure there’s enough tension in the band during the entire movement.
What Are the Best Resistance Bands? (Types and Product Recommendation)
In the Resistance Band Workout above, Coach Matt showed you how to handle two types of resistance bands: loop bands and tube bands.
Let’s go over these and other resistance bands you may come across.
#1) Loop Bands

Much like the name would suggest, loop resistance bands consist of one single band formed in a loop.
They don’t have handles and are more strap-like than chord-like.
Not only can you use these in the exercises covered above but you can also use them to help perform bodyweight exercises like assisted pull-ups or assisted bodyweight dips.
You can check out our guide The 42 Best Bodyweight Exercises for more on this topic.
For purchase, Grebest has a loop band that isn’t too shabby.
#2) Tube Bands
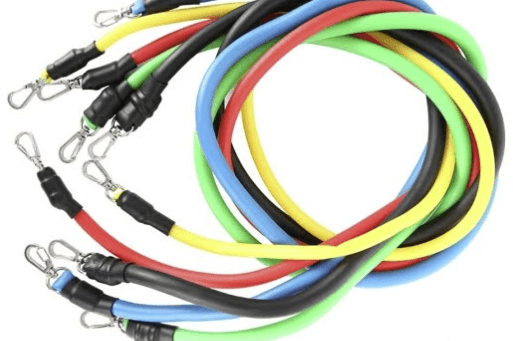
Tube resistance bands will often have handles or carabiners at the end (which you can attach a handle or anchor to). You might also hear these called “fit tubes.”
As Coach Matt showed you, every exercise in our Resistance Band Workout can be done with a tube band, so they’re ideal for creating a home gym.
The other cool thing about these bands: you can attach two of them to the same anchor and handle, increasing the amount of resistance. There’s really nothing stopping you from doing a third band either, which means they can really help increase your strength.
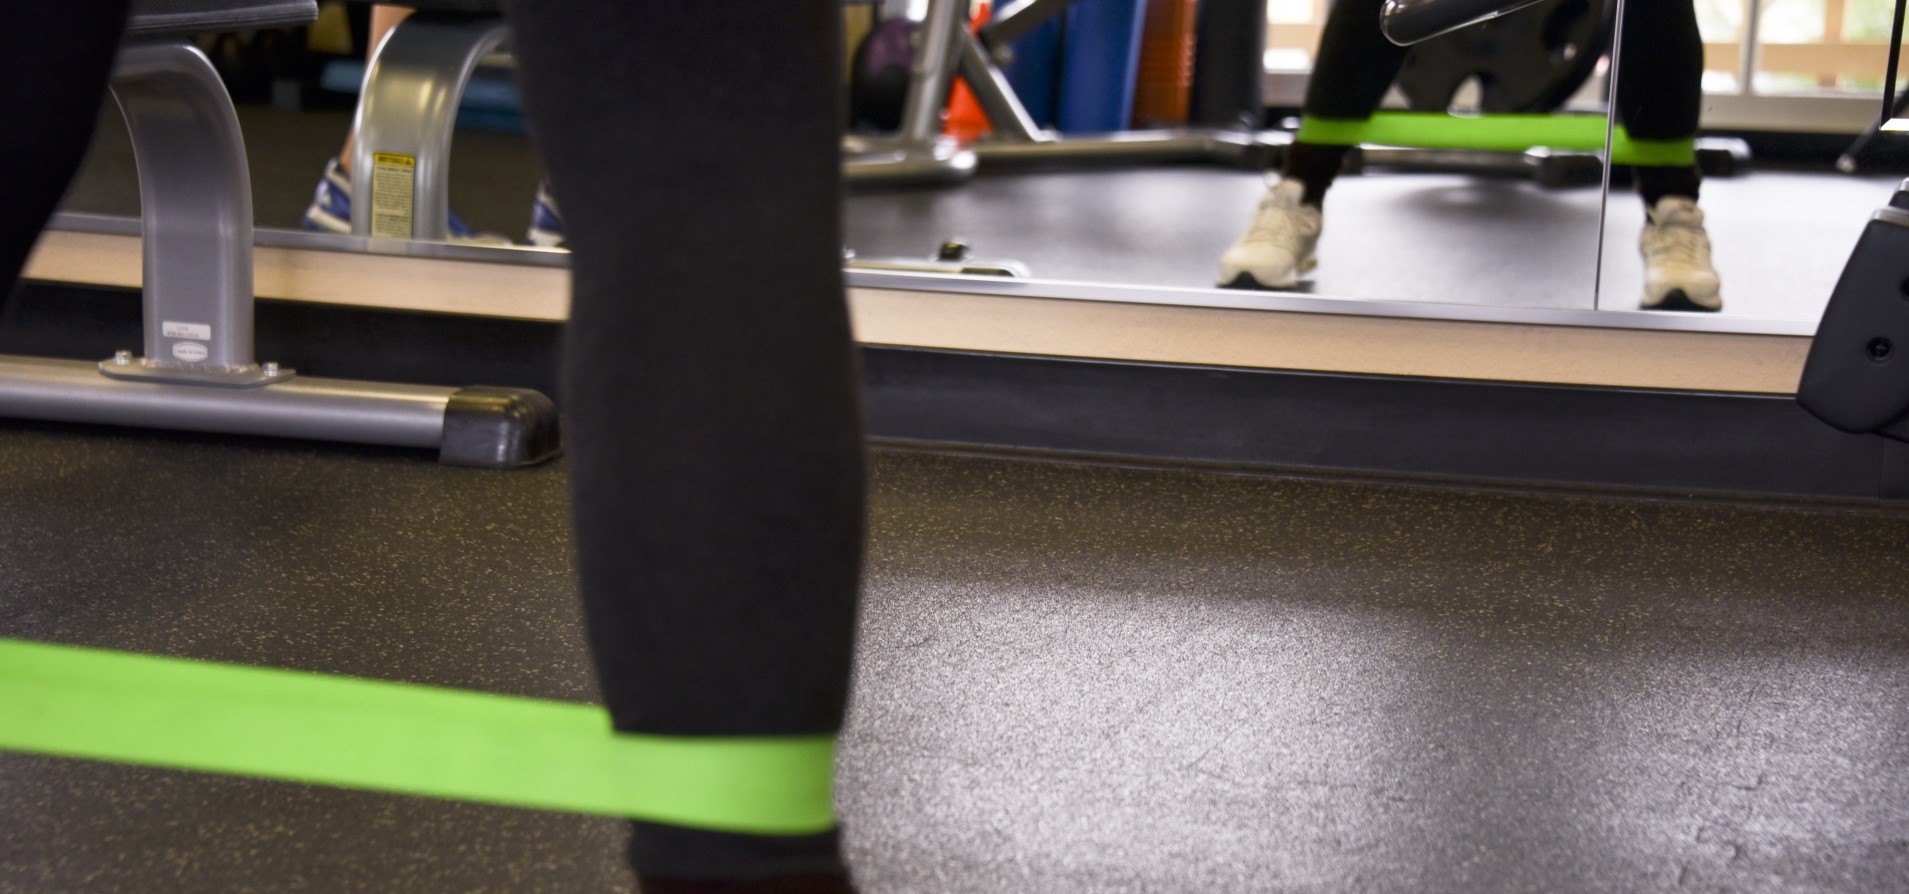
#3) Mini-Bands (Circle Bands)
Mini-bands are like loop bands, but smaller, thinner, and wider.
They are often used for lateral movements, by placing them above your knees or ankles.
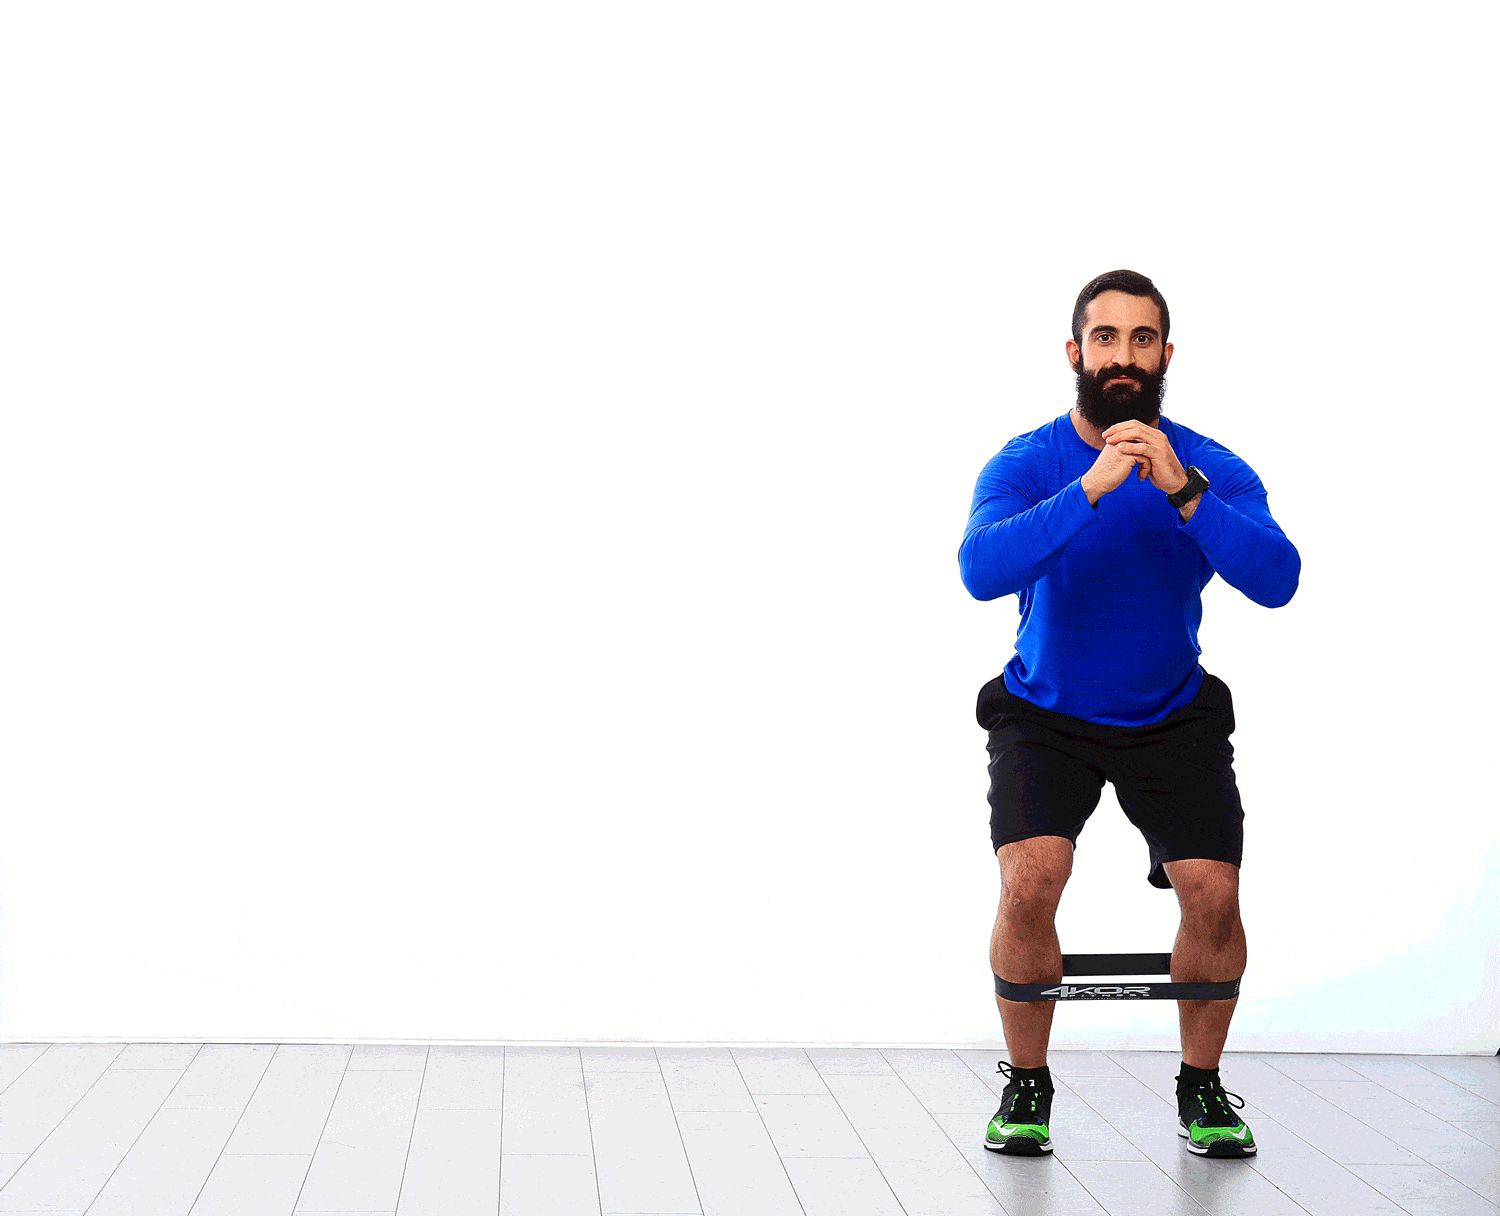
This offers more resistance to the movement, further activating your hips and glutes.
Rogue carries some tube bands that some of our coaches use.
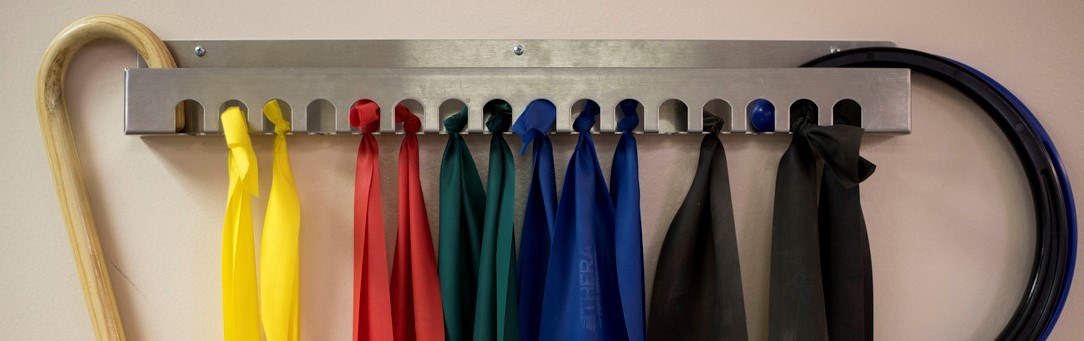
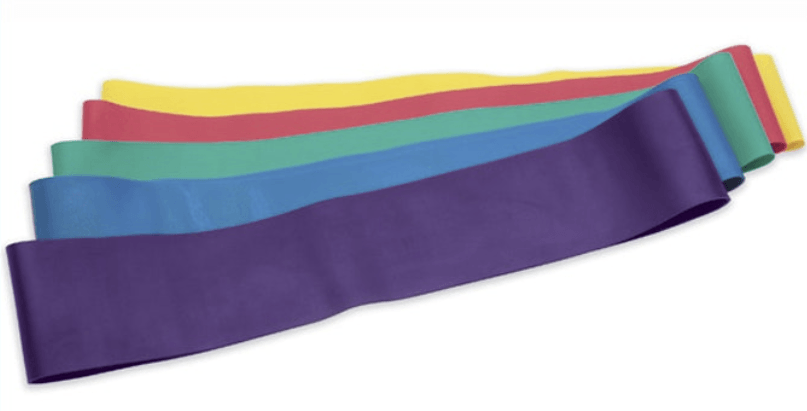
#4) Therapy Bands
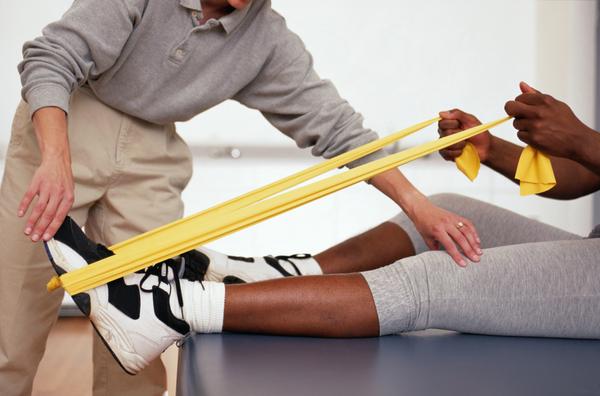
Therapy bands are long (up to 6 or 7 feet) and thin, almost like a sheet.
They do not loop, although they can be tied together to form a loop.
Like the name would suggest, therapy bands are often found in rehabilitation centers, used to help strengthen muscle after someone has gone through an injury.
They’re generally “light” on the resistance offered, making them ideal for someone looking for a low-impact exercise.
Therapy bands offered by Hoocan are pretty decent and can be found on Amzon.
#5) Figure 8 Bands
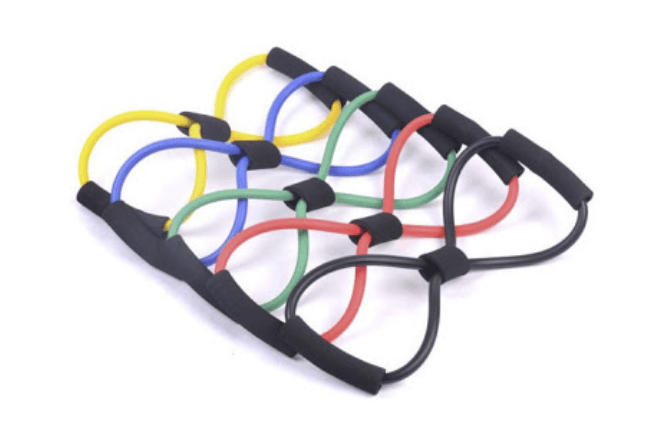
No surprise here: these bands look like a figure 8, with handles on top and bottom.
These bands are great for many of the pull-apart exercises we covered earlier, and can also be used like the mini-bands to activate your hips and glutes, by placing each leg through one of the loops.
SPRI has some bands you can find on Amazon.
How to Use Resistance Bands (5 Tips and Tricks)

Let’s discuss a few tips so you can make the most of your resistance band workout.
#1) Do not use the band if you notice cracks or tears.
Seriously, just buy another one. You do not want a resistance band snapping on you while in use.
#2) If you need more resistance, add another band.
The tube resistance bands with carabiners are great for this because you can pretty much always add another band between your handle and anchor.
#3) When anchoring your bands to a door, make sure the door pulls away from you.
You don’t want to accidentally force the door open, which could result in injury or hurt feelings.
#4) Maintain band tension throughout the exercise.
When starting every exercise covered here, you want a little tension at the start of the movement. This will help keep your muscles engaged during the entire exercise.
#5) Be careful what you anchor your bands to.
While a band may fit around a tree, the rough surface could wear down your band, causing it to snap. Check the surface, and if your bands come with anchors, use those.
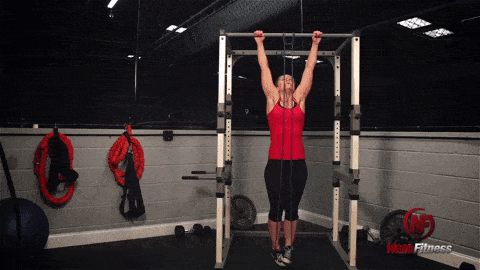
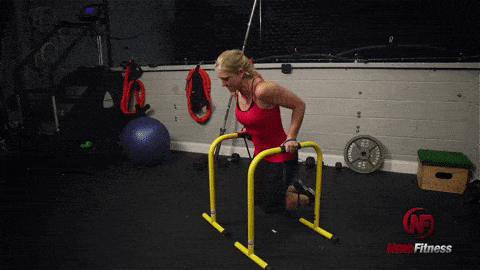
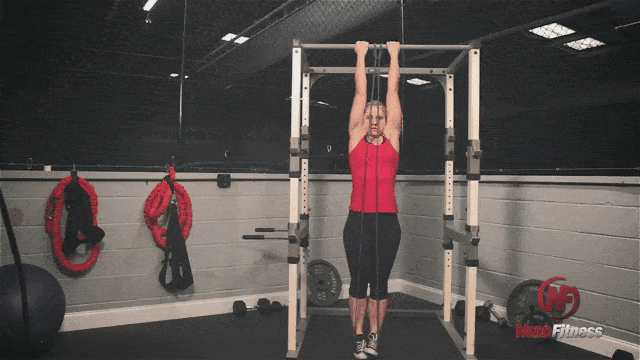
How to Do Assisted Exercises with a Resistance Band
In the video above, Coach Matt walks you through using a resistance band to do pull-ups.
It’s not the only exercise where a band might prove helpful.
Here are some “assisted” exercises where a resistance band may prove helpful:
#1) Assisted Dips:
#2) Assisted Chin-ups:
Just like the pull-up above, but your palms face you.
Can You Lose Weight With Resistance Bands? (Weight Loss 101)
If you’re trying to lose weight, a few resistance bands and the workout routine above could be a great part of the plan.
The other part of the plan should be your nutrition!
As we lay out in our Coaching Program, throughout Nerd Fitness Prime, and our massive guide on “Healthy Eating,” we believe that nutrition is 80-90% of the equation for weight loss.

No joke.
It’s by far the biggest factor for success.
So will you lose weight training with resistance bands?
Maybe!
If you fix your diet AND begin to incorporate our resistance band routine a few times per week, you’ll find yourself building muscle, losing fat, and getting stronger!

So how do you fix your diet?
Great question.
Whether you choose to follow a Keto Diet, Paleo Diet, Mediterranean Diet, or something like Intermittent Fasting, the best path will be up to your goals, your situation, and your habits.
Here are some basic tips though (as we cover in The 5 Rules of Weight Loss):
- If your goal is weight loss, you have to eat less than you burn each day. This can be through eating less and burning more (from the resistance band workout above)
- Processed foods and junk food make it really tough to lose weight: They have lots of calories and carbs, low nutritional value, don’t fill you up, and cause you to overeat.
- Vegetables are your friends. If you don’t like veggies, here’s how to make vegetables taste good.
- Liquid calories are sabotaging your efforts. Soda, juice, sports drinks: they’re all pretty much high-calorie sugar water with minimal nutritional value. Get your caffeine from black coffee or tea, fizzy-drink fix from sparkling water.
- Eat more protein! Protein helps rebuild muscle and can help you stay under your calorie limit because it’s satiating and filling. Here’s exactly how much protein you should be eating every day.
Those tips should get you started, but if you want more specific instruction and guidance, check out the NF Coaching Program – Your Coach will build a routine tailored to your individual needs and what equipment you have available:
When Should I Do a Resistance Band Workout? (Next Steps)

The only question left to answer here is this: when should you do your resistance band workout?
As I discuss in our guide, How to Build Your Own Workout Routine, I generally recommend newbies complete a full-body workout two to three times a week.
When we say “full-body,” we want a sequence that will hit the following:
- Quads (front of your legs): the band squats have you covered here.
- Butt and hamstrings (back of your legs): the band deadlifts will hit this muscle group.
- Chest, shoulders, and triceps: (“push” muscles): your chest press and pallof press will engage your push muscles.
- Back, biceps, and grip ( “pull” muscles): all of the band rows will train your back and biceps.
- Core (abdominals and lower back): The pallof press is really going to challenge your core (try it if you don’t believe me).
As you see, the Resistance Band Workout covers all these, so feel free to run through this sequence a few times a week. Just make sure you don’t train on consecutive days (you build muscle while resting).
On your “rest days,” you can look into doing some active recovery, yoga, or fun movement.
If you can only get yourself to work out once a week, that’s okay! Let that become normal, then we can brainstorm ways to squeeze in an extra day.
Building the habit of working out is our goal today. We can worry about maximizing “gainz” down the road.
Don’t get me wrong, I’m all about maximizing gainz.
Now the only thing left to do is start!

Here are some options for next steps with Nerd Fitness:
Option #1) If you want a professional coach in your pocket, who can do video form checks, provide feedback, and adjust your workouts based on the equipment you have available, check out our 1-on-1 Online Coaching Program!
For example, let’s say you find yourself stuck indoors during a pandemic, and you want somebody to custom-build you a workout program based on the equipment and furniture you have. That’s where an online coach is a game-changer!
Personally, I’ve been working with the same online coach since 2015 and it’s changed my life. You can learn more by clicking on the box below:
Option #2) If you want an exact roadmap for getting fit, check out NF Journey. Our fun habit-building app helps you exercise more frequently, eat healthier, and level up your life (literally).
Plus, we have Missions specifically designed to help you train with your resistance bands!
Try your free trial right here:


Option #3) Become part of the Rebellion! We need good people like you in our community, the Nerd Fitness Rebellion.
Sign up in the box below to enlist and get our Rebel Starter Kit, which includes all of our “work out from home” guides.
Alright, I want to hear from you and your experience with Exercise Bands!
Do you rock resistance bands in your workout?
Any band exercises that I’m missing?
Any product recommendations that need to be shared?
Let me know in the comments!
-Steve
P.S. If you are trying to stay at home, check out:
- The 8 Best At-Home Workout Routines
- How to Stay in Shape (While Staying Inside)
- The 42 Best Bodyweight Exercises (Working Out Anywhere!)
- Home to Build a Home Gym (When Everything is Sold Out)
P.P.S. Because I have to:

###
PHOTO SOURCE: Loop Bands, Tube Bands, Mini-bands, Therapy Bands, Figure 8, The road to rehabilitation, Exercise with bands, Exercise and sunglasses, Home Sweet Home, Sunset.
GIF SOURCE: Mini-Band,