This is an article by NF Team Member Staci.
Squat squat squat squat squat squat squat squat squat squat squat….
Everybody!
Wait, that’s not right…
But that’s what I hear, because I love squats.
Why?
Even though the squat is considered by many to be a “leg” exercise, it’s really a full body movement that works just every muscle group in the body.
Not only that, but it mimics a ton of natural movement patterns in everyday life. In this nerd’s opinion, squats are the most useful exercise we can do when it comes to strength training.
Whether your goal is to gain strength or lose weight, squats are one of the fastest ways to get there.
If you’ve never squatted before, you might be a bit intimidated about the idea of starting a big new exercise. Never fear! Today we’re going to go over everything you need to go to start squatting RIGHT NOW.
Squats are a big part of the Nerd Fitness Academy, and today we want to give you the confidence you need to START.
Why squat?

Squats are one of the most foundational functional movements in our lives.
We’ve been squatting since we were babies; as we get older and sit in unnatural positions all day – our squat form goes from perfect, to us not knowing how to squat correctly at all.
In some countries, not only do they continue to sit in a full squat (sometimes called a “third world squat”), but instead of sitting on a toilet, they squat over it.
Before modern day furniture and technology you didn’t stop sitting in a full squat once you got older like we do today…you continued squatting your entire life.
Squats are a compound movement – which means it’s a movement that uses more than one joint (your hip and knee joints) to complete.
A simple bodyweight squat uses almost every muscle group in the body – and if you add a dumbbell or barbell into the equation, I would even argue that they use every single major muscle group to complete. Just think about it – in addition to your “legs,” you need your hips, your back and core, your shoulders and arms. Nothing is left out with this monster movement.
Squats will help strengthen your entire body, both your bones and your muscles (and your knees!), and increase flexibility.
Because of the utilization of a large amount of muscle groups, they cause your body to increase our anabolic hormone production (in turn, helping us lose fat and gain muscle).
Increasing the strength in your knees and hips (and entire body) reduces your chance of injury while doing both athletic movements and everyday life things (such as shoveling the driveway or standing up and sitting down).
In short, squats are amazing.
They are one of the biggest bangs for your buck in terms of time, which is why most good strength programs will have you squatting 2-3x a week.
Let’s start off by taking a look at the bodyweight squat – the first move you should master before you add weight.
- 15 Fitness traps you should avoid
- Comprehensive beginner's guide to Paleo diet
- BONUS: How to level up your life and be the hero of your own story
The Bodyweight Squat
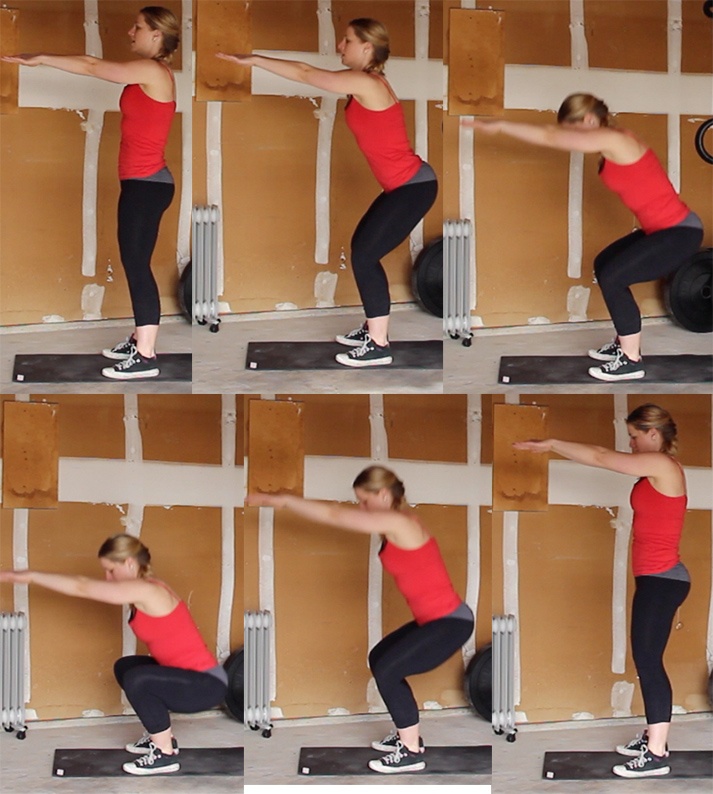
The setup for the squat is incredibly simple. Stand with your feet slightly wider than your hips. Your toes should be pointed slightly outward – about 5 to 20 degrees outward.
Look straight ahead and pick a spot on the wall in front of you. You’ll want to look at this spot the entire time you squat, not looking down at the floor or up at the ceiling.
I go over the setup and the full movement in this video:
For a bodyweight squat, I put my arms straight out in front of me, parallel to the ground. Keep your spine in a neutral position. This means don’t round your back, but also don’t hyper extend and over accentuate the natural arch of your back.
Think about where your weight is on your feet – it should be on the heels and the balls of your feet, as if you were pasted to the ground. You should be able to wiggle your toes the entire movement (though that’s not a part of squatting!).
Keep your entire body tight the entire time.
Now, breathe in, break at your hip and push your butt back. Keep sending your hips backwards as your knees begin to bend. It’s important that you start with your hips back, and not by bending your knees.
Keep your back straight, with your neutral spine, and your chest and shoulders up. Keep looking straight ahead at that spot on the wall.
As you squat down, focus on keeping your knees in line with your feet. Many new lifters need to focus on pushing their knees out so they track with their feet. So, watch you knees! When they start to come inside the toes, push them out (but not wider than your feet). Think about it like this: if you were to attach a laser to the end of each of your knees, the laser would track between your second and fourth toes. Make sure your knees are out!
Squat down until your hip joint is lower than your knees (what we call parallel). We are looking at your hip joint here, not your thighs. Depending on the size of your thighs, your squat may appear to be less deep than it truly is. You can go deeper than this, however, anything less than parallel is a partial squat.
That’s a power curtsy. We don’t do those at NF. We do full squats!
Once at the bottom, it’s time to stand back up!
Keeping everything tight, breathe out and drive through your heels (keep the balls of your feet on the ground as well).
Drive your knees out the same way you did on the way down, and squeeze your butt at the top to make sure you’re using your glutes.
Remember: keep your body and core tight the entire time. This is important now, but will be especially important once we start adding weight to the equation.
Note: Due to the fact that all of our bodies are different, none of our “perfect” squats will look exactly the same – someone with a longer femur, for example, will squat slightly different than someone with a shorter femur. Also, the majority of the population has some sort of mobility issue (including myself!) that they are working on fixing – so if your squat looks different than the person next to you, that does not mean you’re doing it wrong!
- 15 Fitness traps you should avoid
- Comprehensive beginner's guide to Paleo diet
- BONUS: How to level up your life and be the hero of your own story
The Barbell Squat
There are many different types of barbell squats: the three most common are the high bar back squat (sometimes called an “Olympic squat” or “Oly Squat”), a low bar back squat, and a front squat.
All of these use a barbell – the big difference being the placement of the barbell.
The placement of the barbell changes up a few things about the mechanics and geometry of the squat, and because of this the muscle recruitment is different. The low bar is a posterior chain dominant squat, while the high bar and front squat are a quad dominant squat.
This Starting Strength diagram illustrates the difference of each squat.
No matter what type of squat you do, the basic set up will be the same – find a squat rack, power cage, or a squat stand and set the height of the bar to be about the same height as your collarbone. If your options are either too high or too low, it’s always best to go too low – you don’t want to have to get up on your toes to rack/unrack the bar, especially as the weight gets heavier.
Now, as we discussed in “How much weight should I be lifting,” always start with just the bar – even if you’re planning on squatting 500 lbs. Always warm up with a few sets with just the bar.
Low Bar Back Squat
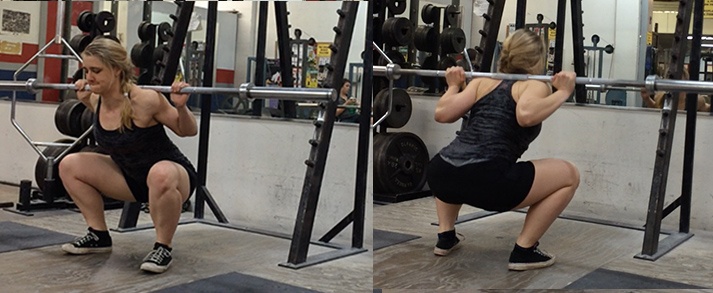
This is the most common form done by beginners, general lifters, and powerlifters. It’s the form taught in Starting Strength, one of the best book for beginners on the market.
Start by stepping up to the bar, facing it. Step under the bar, and put your hands around it. For this type of squat, we are going to want a thumbless grip, so that our wrists are properly aligned with our forearms.
The width of your grip will be dependent on flexibility, but generally a narrower (closer to your shoulders) grip will help create a meaty shelf for you to place the bar on out of the muscles in your upper back (the bar will end up sitting on your rear deltoids). If you lack the flexibility for the narrower grip, start out wider, then slowly bring it in as you get more flexible.
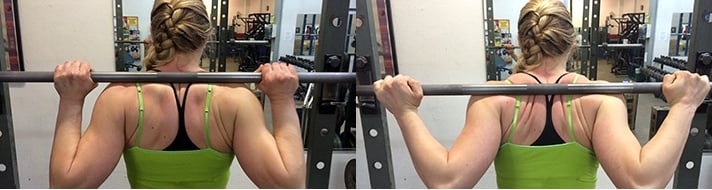
See the difference here between a “wrapped grip” (Left) and “thumbless grip” (right):
Now, once the bar is on your back, stand up, brace your core (tighten your glutes and flex your stomach), and step back (if you did this right, you should always have to step back, not forward).
From here, set up just like you did for your bodyweight squat – feet slightly wider than hip width apart, toes slightly pointing outward, butt back, squat down slowly, drop so the tops of your legs are parallel or lower, and stand back up.
Due to the fact that this is a posterior chain dominant squat, you will most likely be able to do more weight with this version than the other two.
The High Bar Back Squat
With this version of the squat, we are going to start out the same way, only instead of using a thumbless grip, we are going to put our thumbs around the bar. The same thing goes with the grip – the narrower the grip, the better of a “shelf” will be formed on your back to hold the bar.
However, a super narrow grip is hard to achieve, especially when starting out, due to lack of flexibility. Instead of placing the bar on your back on your rear deltoids, you’re going to be placing the bar about two inches higher up, on your traps. The bar will then be across your shoulders.
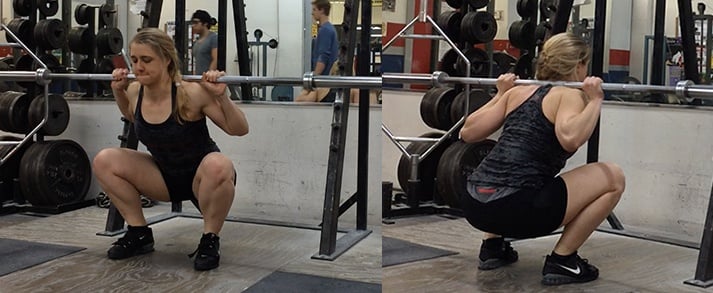
Again, see the difference here between a high bar (left) and low bar squat (right):
Now, it’s very important to note that even though the bar is across the top of your shoulders, it is not on your spine. If it’s on your spine, it is TOO high, and can cause serious damage.
Put the bar on your back, step back, stabilize and tighten your core, and squat down.
Due to the placement of the bar on your back, this version of the squat will require you to keep your torso more upright, so if you really struggled with this on your bodyweight squat, you will probably struggle keeping your chest up here.
That does not mean NOT to try – it just means to make sure to keep the weight low until you get it right – you don’t want your chest to collapse forward and have the bar roll on to your neck.
Front Squat
The last version of the squat that we are going to go over today is the front squat. Due to the placement on the front of the shoulders instead of on the back, the front squat is more quad dominant, but also requires you to be able to keep your torso much more upright than with the back squat (both versions).
Instead of stepping under the bar, place the bar on the front of your shoulders. Now, grab the bar with your hands. This is the most difficult part with the front squat – it requires a lot of wrist mobility and flexibility.
Most people can not front squat with a full grip around the bar, and instead will let the bar roll onto their fingertips (a three finger grip is okay here). If you can’t even get your fingers around the bar, there are a few variations you can start with genie front squats or strap front squats.
Keep your hands holding on to the bar if you can (it’s okay to let the bar roll onto your fingertips), and keep your elbows up so that your upper arms are as parallel to the floor as possible. Like before, drop below parallel, and come on back up (Here’s a quick video).
Keeping your elbows as high as possible the entire time is extremely important in the front squat – as soon as you let them drop, the weight will likely pull you forward out of correct positioning, and you will either drop the weight or potentially get injured.
Which Should I do?
Now you might be thinking, “Staci just tell me which one I should be doing!”
Most weightlifters will argue that you should always do high bar, while other camps will argue that the low bar is better. Both have advantages and disadvantages that are specific to sport, and you could spend all day every day for weeks reading arguments for each.
The truth is, especially if you’re just starting out, do the squat that you can do with the best form and achieve proper depth. Once you’ve got the correct mobility to do all three forms properly, ONLY then you can worry about which version to do.
And don’t worry – we’ll be going into more depth on all things squat in future Strength Training 101 articles.
Common Faults
The squat is a basic movement, but those new to lifting often fall victim to a handful of common mistakes.
Let’s take a look at some of the big problems and how to fix it!
Coming up on your toes with your knees forward
It’s important to keep your heels on the ground the entire time you’re squatting. You should be driving through your heels, and in order to do that, they need to be on the ground!
While some of your weight will be on the balls of your feet, you never want all of your weight to be on the balls of your feet or your toes. You should be able to lift your toes up off the ground and wiggle them at any point and it shouldn’t change anything about your squat.
Not hitting depth
Your squat should hit at least parallel – where your hip joint goes below the knee.
Depending on what you’re training for, you can go lower, but in order to maximize the muscles worked in the squat, it needs to be done to at least parallel or lower.
If you squat above parallel (a partial squat) you’ll actually put a lot of stress on the knees and quads by mostly leaving the hamstrings out of the movement. This puts more pressure on the knee – the force put on your knee is actually reduced as you drop below parallel.
Unfortunately, there’s a lot of misunderstanding about squats and knee issues.
The deeper the squat, the more glutes that are activated as well. Deeper is typically harder, both strength and flexibility wise. However, depending on your goals, squatting to parallel may make more sense.
If you’re struggling hitting depth there could be many causes – you could have poor ankle mobility, tight hip flexors and/or hamstrings, weak glutes, or poor pelvic alignment (among many other things).
We will go over a variation to help with this later in this article!
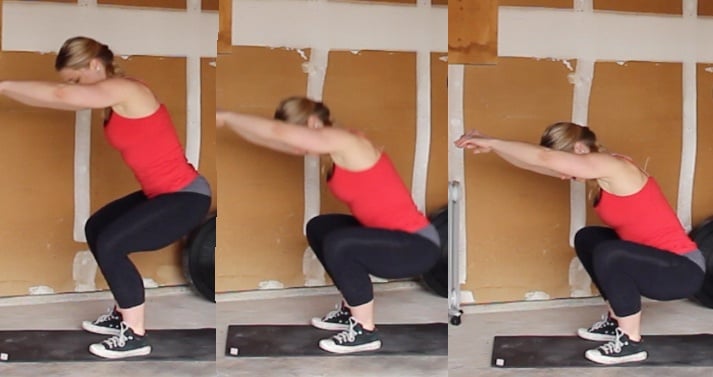
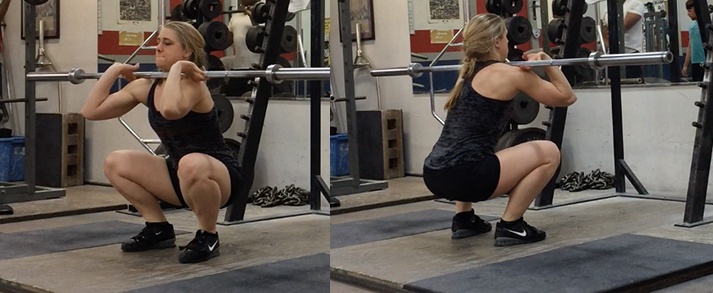
Knee Positioning (left image below)

When you squat, you want your knees to track along with your toes. Everyone’s exact positioning is going to be slightly different, but they should not be on the outside or the inside of the foot. Rather, more or less along the center.
Back Positioning (middle image above)
Your chest should be up and your shoulders should be back. Your body should stay in this position the entire time. You don’t want your shoulders to round forward, but you also don’t want to hyper extend your back either.
Keeping your spine in a neutral position the entire time is the way to go.
Head Positioning (right image above)
Many coaches will tell their lifters to look up, as that is the direction in which you want to be moving, but this is actually the last thing you want to do. Take a second quick and look at the ceiling (I’ll wait! 🙂 ).
Now, see that position your cervical spine is in? That is a very unsafe position for your spine to be in, especially when weight starts getting included in the equation. You also don’t want to be looking directly at the floor.
Look straight out in front of you the entire time, with your head in a “neutral” position. Your chin should be in a position where you could hold a tennis ball between your chest and your chin.
Weight too much on the heels/on the outside or inside of feet
When trying to fix coming up on your toes, or your knee positioning, it is common for people focus so much on keeping their weight on their heels that they forget to keep the balls of their feet on the ground! Some of your weight will still be on the ball of your foot – if you are truly only having weight on your heels, it’s pretty hard to balance.
To the same effect, if the inside of your foot or the outside of your foot comes up off the floor, this is also not a good thing!
This all seems a bit…complicated

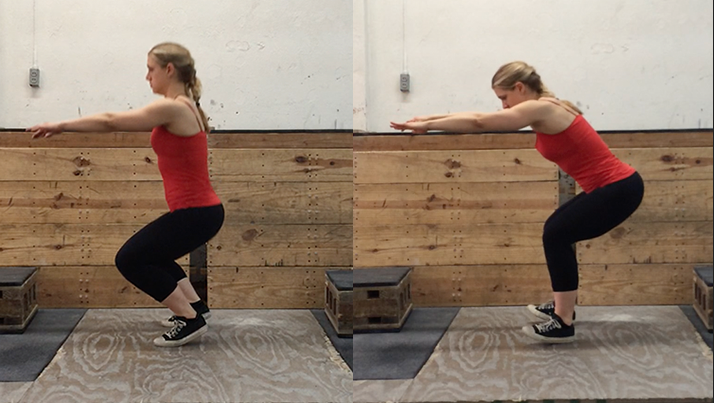
If you’re struggling getting your squat right, don’t fret! There’s a great way to help you get your first bodyweight squat with proper form – and that’s by sitting back on to a box first (pictured above!). Squatting back to a box is also great for people who have bad knees and can’t do bodyweight squats anymore.
Squatting to a box will help teach you to sit back and keep your weight on your entire foot, instead of squatting with your knees forward and up on your toes.
In order to do this, find a box or a chair that is the right height so when you sit on it, you are at parallel with your squat or below. Step stools, milk crates, or the smallest box at the gym (there’s usually a set of plyo boxes, and the shortest is around 10″.)

The lower the box, the more it will help you develop stronger hips and low back – the box at exactly parallel will help you more with quad strength. However, if you’re just starting out – the height of the box isn’t the most important thing – just make sure it’s parallel or below.
Now, set up exactly as if you were going to do a regular bodyweight squat, only standing about a foot in front of the box.
Breathe in, butt back, keep your knees in line tracking in the same direction as your toes and squat back until you sit completely on the box. Don’t plop back on the box, make it slow and deliberate while keeping your entire body tight.
Now, don’t move! Think about your positioning. Is your back and core still super tight? Is your weight on your heels and your mid foot? Is your head in a neutral position? Great, now stand up by driving your hips upward, don’t let your weight shift forward and onto your toes (drive through your heels!), shoulders and chest up, knees out keeping them lined up with your toes.
Your first few, feel free to sit on the box while you evaluate your positioning, but as you get better at them, sit back and then quickly stand up again.
You know you’re doing a good squat when you can stand back up from the bottom of a squat position without having to lean forward and use momentum to get up. You can squat, touch your butt to the box, and then stand back up without having to shift your weight around! KEEP THAT BUTT BACK!
- 15 Fitness traps you should avoid
- Comprehensive beginner's guide to Paleo diet
- BONUS: How to level up your life and be the hero of your own story
Start squatting

Squats are awesome.
How awesome? This kid dropped into a perfect squat just to impress his bunny friend.
Although some claim squats can be bad for your knees, the movement is actually one of the safest and BEST things you can do to boost your knee health (when done correctly!). Not only does it strengthen your knees (even if you’re older), it helps improve stability, and help reduce the chance of injury.
(Note: If you’re already injured, or squats are hurting your knees and you think you’re doing everything right, please check with your doctor or a physical therapist to check on your personal situation and form)
Our knees are built to squat. That being said, years of bad movement can make it hard for a lot of us to get into the correct positioning to squat correctly, which causes pain and makes squatting bad for you. If you can’t get into the correct positions, work on the mobility you need to get there before you start squatting seriously.
We plan on going over the squat in TONS of detail in the future. So, help us out!
What struggles do you have when trying to squat?
What questions do you have?
If you haven’t squatted before, what else do you need us to tell you to give you the confidence to start squatting TODAY!?
-Staci
PPS – Be sure to check out the rest of Strength Training 101 series:
- Strength Training 101
- Strength Training 101: Equipment
- Strength Training 101: Finding the Right Gym
- Strength Training 101: Where do I start?
- Strength Training 101: How much weight should I be lifting?
- Strength Training 101: The Overhead Press
- Strength Training 101: The Deadlift
###
photo source: Jordan Colley Visuals: bunny squat