- Slowly lower yourself into a comfortable squat, placing both hands on the floor in front of you, and as you come down place your hands on the floor. As you place your hands on the floor in front of you, make sure to not shift your weight up onto your toes. You should be able to wiggle your toes throughout this entire pose.
- Very slowly walk both feet out to the side. You can keep your hands on the ground to help with balance. Your goal is to stay consistent and even through both sides.
- As your feet slowly walk out, your legs should eventually straighten out to each side. Your feet and toes should be facing straight forwards, or slightly outwards (away from your body).
- Stop at whatever height is comfortable, and where you feel a slight stretch. DO NOT try to push yourself down or continue to slide your legs out past your body’s limits.
- Your back should stay tight, and your hips should stay in line with your legs (don’t lean forward or back too far). Avoid rolling onto your ankles. If you feel yourself coming forward or backwards, it means you’ve reached your natural safe limit. Stop and record.
Have a friend record the distance between your heels or your toes. If you’re doing this alone, lay a measuring tape down first, and note the distance before standing back up.
Benchmark #4: Forward Splits
- Start by kneeling on the floor in a lunge position, with one knee on the floor, and the other knee in front of you, with the forward knee bent at a 90 degree angle. (Basically – “take a knee”). If you are less flexible, it is helpful to do this right next to a wall to help you balance.
- Making sure your hips stay facing forward, slowly straighten your lead leg by gently sliding your foot forward.
- Once your front leg is straight, continue to slowly slide the rest of your body (torso, hips and front foot) forward, keeping your back knee in the same place. As you do this your body will lower deeper into a split.
- As you get deeper into the split, your arms may touch the ground to help balance you. If the don’t get to this point, you can use the wall next to you or a chair to help balance.
- With the support of your hands, continue to slide your body and lead leg forward until you find a comfortable spot. If your hips start to open (and no longer face forward), that is your stopping point. (See image below)
- Once again, DO NOT push yourself further down or move quickly (in or out) of the stretch. Stay comfortable.
Have a friend record the distance between your heels or toes. If you’re doing this alone, lay a measuring tape down first, and note the distance between your heels.
Repeat this measurement with the exact steps to your other side.
Want to improve today’s benchmarks? Here’s how…
In addition to practicing the benchmark poses above, here are some poses from NerdFitness Yoga we recommend to get you started!
Pyramid (30 seconds each side)
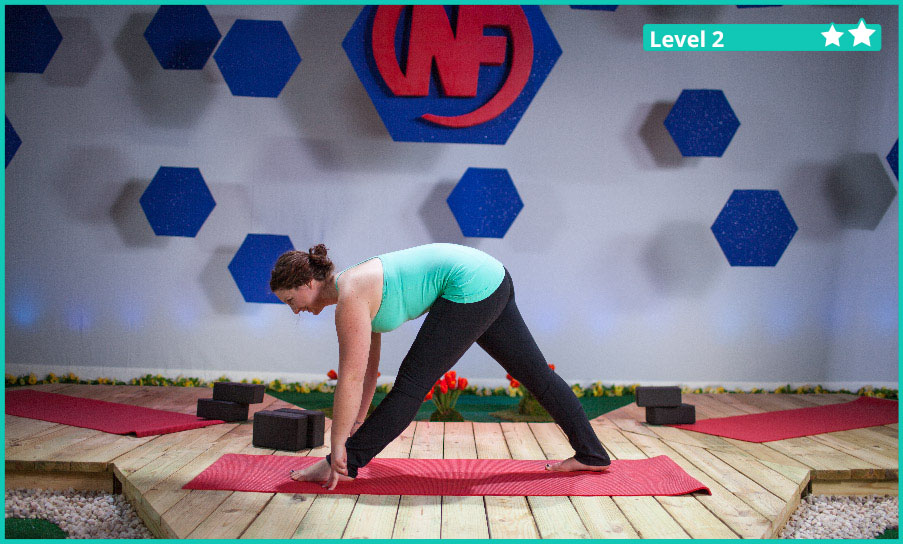
This pose will primarily stretch spine, torso, shoulders, hips, and hamstrings.
- Start by standing with your feet slightly wider than your shoulders and your toes pointing forward.
- Step forward with one leg as if you were going to do a forward lunge – only instead of lunging down, stay standing up. Your feet should be about 3-4 feet apart now, depending on the length of your legs. Make sure your legs are still about hip width apart – this shouldn’t feel like you’re walking on a tight rope!
- Both legs should be straight, but this should not feel like a split – it is not a test to see how far down you can go. The picture of Kate above shows the correct width.
- Turn your back foot out about 45 degrees. Throughout this, you should be pressing through the floor with your back foot.
- With your torso facing forward, make sure your hips are facing forward (remember the hips open vs. forward image earlier?).
- Slowly fold at your hips (not your waist) and extend your torso over your front leg. While you do this, keep your back straight. Start by bringing your torso to about parallel to the ground (or earlier, if it’s too much). As you get more flexible you’ll be able to bring your torso down to meet your front thigh. Try to line up your chest with your front thigh and keep your hips squared forward as much as possible.
To scale down, you can start with a slightly more narrow stance. You also can bend only as much as is comfortable and use blocks or a prop to rest your hands on and balance your weight.
Lunge (30 seconds each side)

Runner’s Lunge is a variation of Lunge (go figure) that allows for an even deeper stretch in a few areas. This pose primarily stretches your hip flexors, hamstrings, quadriceps, and lower back.
- Start in Downward Dog.
- Choose a leg to start and lift it gently up and then walk it forward up and to the outside of your hand.
- Keeping both your hands planted inside your leg, you can slowly lower your weight down intro your hips as you deepen the stretch. Your back leg should remain active and your weight should push back through your foot.
To scale down, you can use yoga blocks or books under your hands to support your weight in the front instead of putting your hands on the floor.
———-
And that’s it for today! Make sure to record your benchmarks and we’ll see you tomorrow for the next two!
-Steve and the rest of the team at Nerd Fitness