Deadlift day is my favorite day of the week.
After reading This Ultimate Guide to Deadlifts – a part of our Strength 101 series – it’ll be yours too!
Click any link below or scroll down to read the whole guide:
- What are the benefits of the deadlift?
- What is proper deadlift form? How to deadlift safely (with videos)
- Setting the bar down (Should I drop the bar on a deadlift?)
- Proper deadlift grip, straps, and other equipment.
- 7 common mistakes when deadlifting.
- What are the different types of deadlifts?
- Frequently Asked Questions on the deadlift (including starting weight).
Teaching people how to deadlift and get comfortable with barbell training is one of my favorite things about our 1-on-1 online coaching program.
We do video form checks via our coaching app, we’ll build a program that fits your schedule, and even help you get your nutrition dialed in too.
If that sounds like something you’d be interested in…
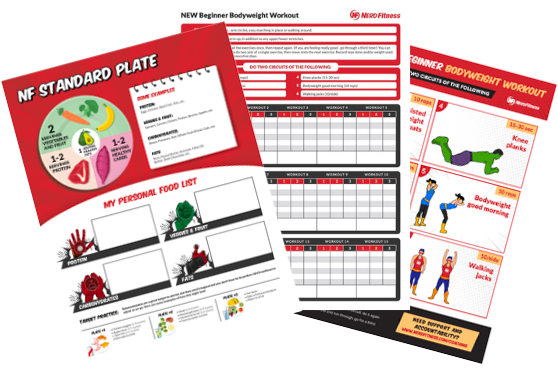
Oh, and if you like this guide, we have an entire Strength 101 Guide that you can download free when you join the Rebellion (our free community).
I’ll send you the ebook when you sign up in the box below!
- Everything you need to know about getting strong.
- Workout routines for bodyweight AND weight training.
- How to find the right gym and train properly in one.
Let’s do this.
What Are the Benefits of the Deadlift?
The deadlift is a true full-body movement.
While most people would consider it a “back” exercise, others will argue that it’s a “leg” exercise.
In my book, it’s an everything exercise.
And who am I?
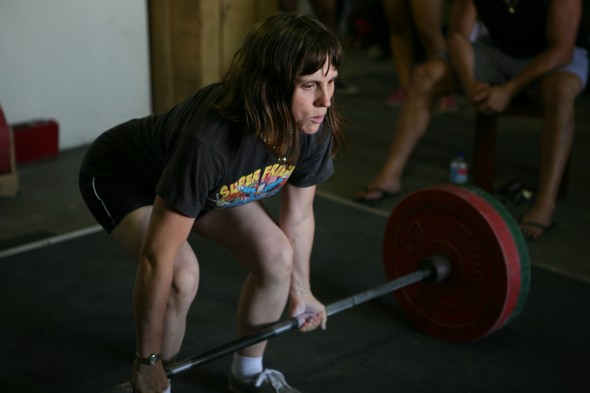
I’m Staci Ardison. I love the Legend of Zelda.
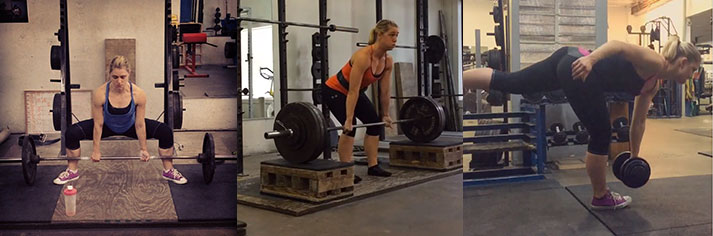
This is me deadlifting 455 lbs (206 kg) at a bodyweight of 150 lbs (68 kg):
Back in 2011, I could barely lift a pink dumbbell.
But then I fell in love with heavy barbell training and the deadlift changed my life:
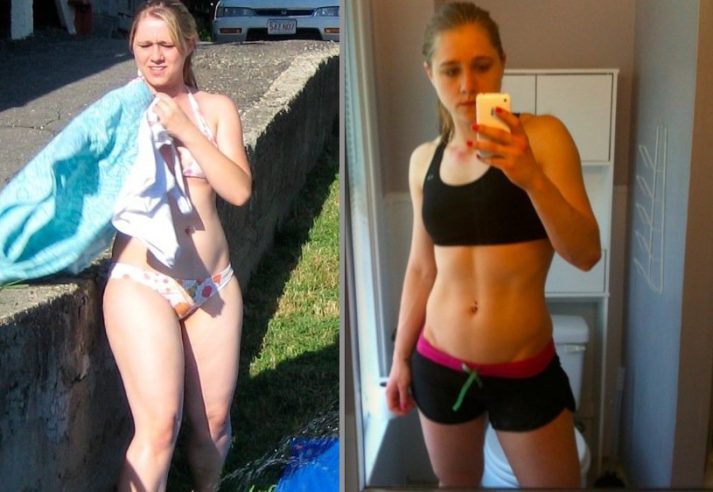
I’m now a regular powerlifting competitor and a Senior Coach for the NF coaching program, where I help people like you hit their strength training goals.
I’ve written this guide on Deadlifts because it’s the exercise that will change your life too.
So why is the deadlift so great?
Well, when you deadlift you use every single muscle in your body:
- Your arms, forearms, and hands hold onto the barbell and make sure the bar stays in the right position and stays stable throughout the lift.
- Your shoulders and traps hold the weight and hold it stable.
- Your back and core help keep your entire body tight and stable to help keep your spine secure.
- Your posterior chain[1] and legs to act as a lever and lift the weight.
Whenever anyone asks me where I got my shoulders/abs/etc, I answer the same: deadlifts.
Why do a million crunches when I can just do deadlifts instead?
Way more fun! Plus, deadlifting is actually more effective at building a strong core.
On top of that, the deadlift is a basic human movement. Other than the squat, there might not be another movement that is more “functional.”
From the grocery store, to moving a piece of furniture, to picking your child up off the floor – you are deadlifting.
As you build solid form deadlifting in the gym, your form for picking things up in real life will also improve.
This means you’ll be less likely to injure yourself now and later down the line (not only because you are stronger, but because your body knows how to properly handle the weight).
And this goes further than just picking up objects – how you move while shoveling snow, doing yard work, and doing other basic everyday life tasks will all dramatically improve from deadlifting.
Don’t be that guy/gal with back problems from lifting that random object!
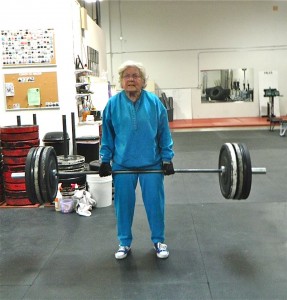
Oh, and by the way, the effectiveness of the deadlift isn’t limited to an age or gender – even grandma thinks they’re cool.
The deadlift is awesome – perhaps the purest measure of strength: either you can pick the weight off of the ground, or you can’t.
What Is Proper Deadlift Form? How to Deadlift Safely
When doing a deadlift you’ll be lifting a dead weight off the ground (hence the name, duh).
The deadlift can actually be taught in one sentence:
“Bend your knees and bend over with a flat back to pick up a loaded barbell off the ground.”
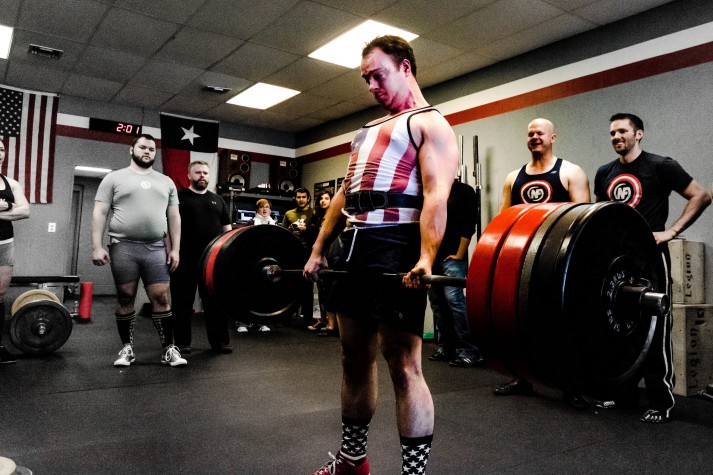
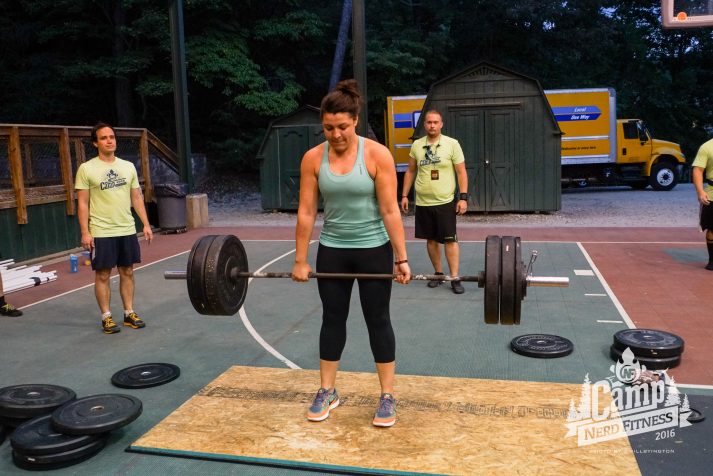
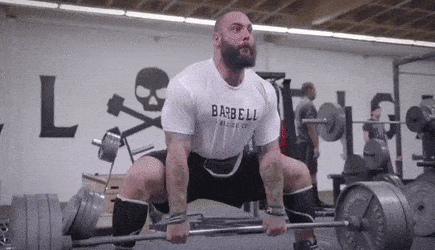
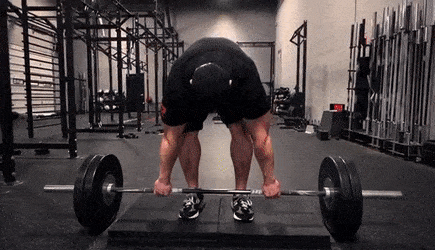
It looks like this (this is Team NF’s Steve pulling 420 pounds):
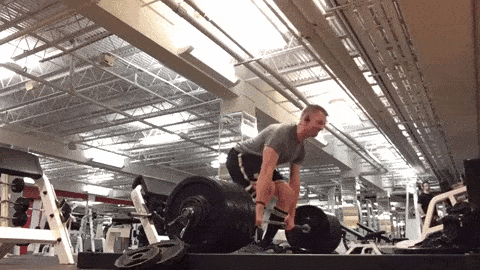
Of course, this sentence doesn’t do the awesomeness of this exercise justice.
Here’s how to do a conventional barbell deadlift:
- Step up to and under a barbell with your feet angled slightly outward, at hip-width apart.
- Bend over and grip the barbell with both hands at shoulder width.
- Bend your knees until the bar almost touches your shins.
- With a neutral spine, flex your butt and brace your stomach.
- Pick the bar up off the ground (It helps to think “press DOWN into the floor with your feet through your heels”).
- Continue pressing down with your legs until the barbell passes your knees, then thrust your hips forward until you are standing up.
- Reverse your movement until the bar returns to its starting place on the ground.
- High five yourself for you doing a deadlift.
(Don’t worry I’ll get more in-depth below.)
Oh, what’s that?
You want even MORE detail on each of those steps!? Sure.
PHASE ONE: The Deadlift Setup.
*NOTE: Always warm up properly, and start with just the bar, even for deadlifts!
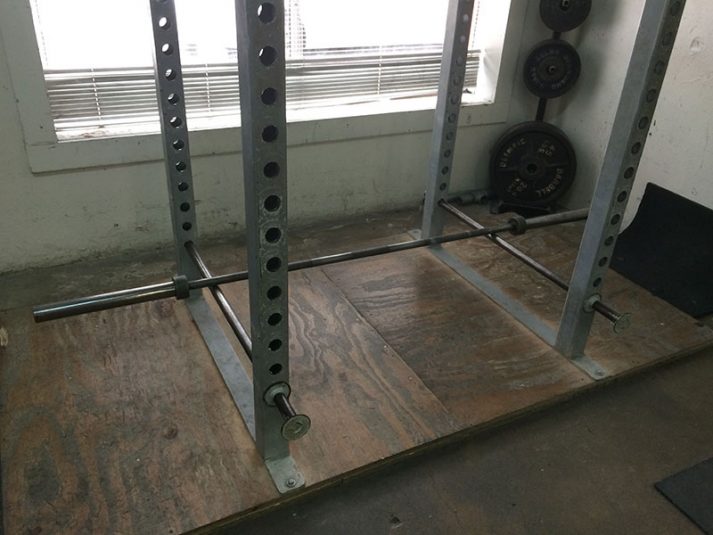
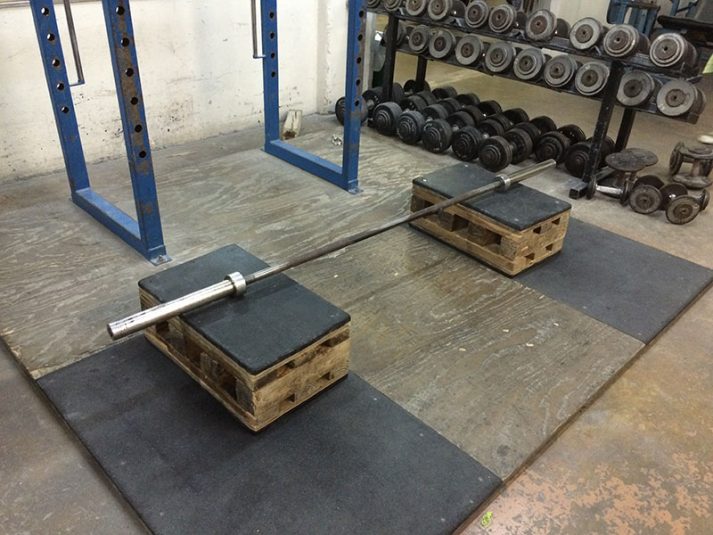
- Load the bar and secure the plates with collars. If you are just starting out with the movement, begin with 5-10 lb plates, using boxes or blocks to elevate the bar to about where it would be with 45 lb plates attached (if your gym has training plates that are this size, even better!). You may also be able to use your gym’s power rack for this.

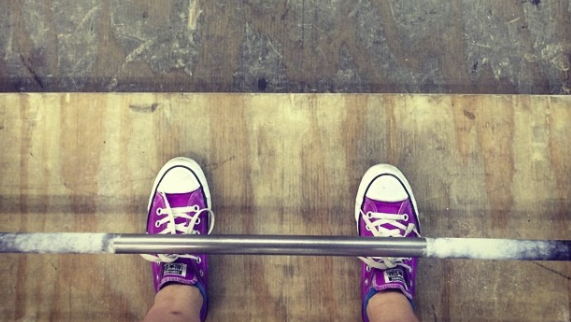
- Step up to the bar as if you are about to JUMP. Naturally, your feet should end up about hip width (8-12 inches) apart, and your feet slightly angled outwards (5-10 degrees).
- Look down – the bar should be over the middle of your feet. If you’re wearing laced shoes, the bar would be approximately over the tied part of your shoelaces.
PHASE TWO: Preparing to lift the bar!
Here are the next steps to take before lifting the bar off the ground (I’ll petition Websters to add the word “deadliftoff” to the dictionary):
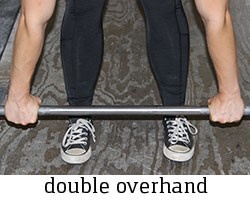
- Without moving the bar, or your hips, bend over and grab the bar. Your legs should still be straight at this point. Your grip width will be slightly outside of your legs, but not so close they touch. For now, a simple double overhand grip (both palms facing behind you) will work. We will discuss options in grip in more detail later!
- Now that you’re holding onto the bar (but not moving it), move your hips down. While you do this, your shins will come forward until they touch the bar Stop moving your hips down when your shins touch the bar.
- Press your chest out and flex your pecs like you’re King Kong getting ready to bang on your chest for intimidation. As you do this, your back should flatten, and your spine should go into a neutral spine position.
This is the final starting position of the deadlift: everything is tight and in position and you’re ready to pull.
To Recap we DON’T want your back to round or hyperextend.
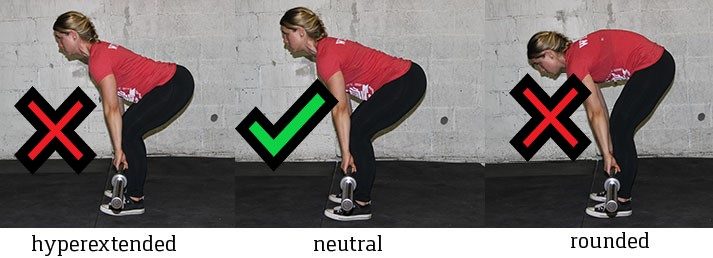
If you’re just starting out, getting into a neutral spine might feel like you’ve gone too far (hyperextended), so don’t be afraid to ask a friend for help or to record yourself so you can see what you’re doing.
We also do form checks with our 1-on-1 coaching clients for stuff just like this.
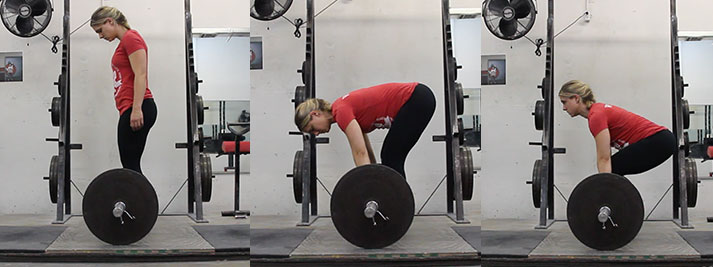
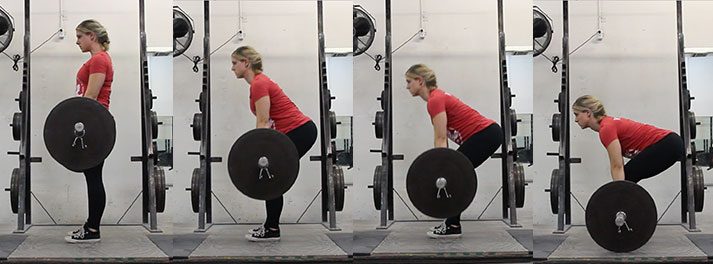
PHASE THREE: Deadlifting with proper form (THE DEADLIFTOFF!)

If your setup looks and feels good, you’re ready to lift.
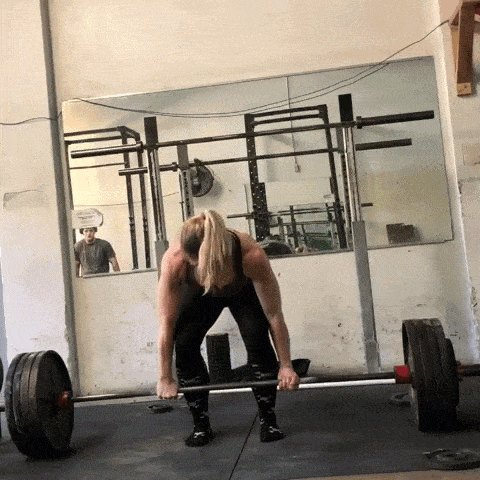
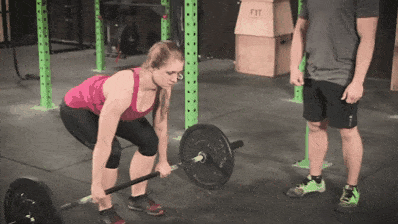
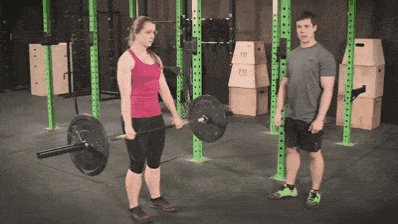
Here is the Conventional Deadlift, as demonstrated by me (Staci) and Jim from the NF Coaching Program:
Here are those steps in written form.
Inhale and fill up space deep in your stomach (like a deep belly breath), and while keeping your entire back, butt, and core tight with your chest puffed out, drive down through your heels and the bar should lift off the ground:
- All of your weight should be on your heels and midfoot. You should be able to wiggle your toes the entire time (though that is not a part of deadlifting!). Imagine you are pushing the earth world away from the bar with your heels rather than pulling the bar up.
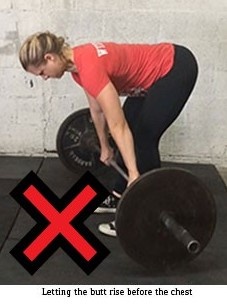
- During the movement, your entire body should move upwards at the same speed. This means that your butt should not rise faster than your chest, or vice versa. You may have heard of the term “stripper deadlift” – this is when your butt rises first before your chest.
- Your arms should stay straight the entire time. They are just there to hold onto the bar – they are not bending or pulling at all. Your legs and core are doing all the work!
- The bar should stay in contact with your body the entire time – you will literally be dragging it up your thighs. This is why you see many powerlifters with chalk or baby powder covering their legs (and why they typically wear socks that cover their shins, to prevent cuts and scrapes). Do not let it come forward. If you were to draw a line that follows the bar’s path from the floor to lockout, it should be a straight, vertical line.
- As you are pulling, you should be squeezing your glutes like you’re pinching a penny between your…well, you know. Once the bar passes your knees, think of getting your hips under the bar by squeezing your glutes. So while you’re pulling with your arms, you’re pushing through the floor with your feet, pushing your butt under the bar.
- At the top of the movement, you should be standing tall and proud with your chest open, like if you were King Kong getting ready to pound his chest.
- At the top, do not hyperextend and lean back. You want to keep your spine neutral and everything tight.

I realize that’s a lot to take in, and that’s okay! You’ve read this far and I’m proud of you.
Many people are so afraid of the deadlift and avoid it at all costs because they’re afraid of splitting themselves in half or getting injured in another way.
That’s why we not only created this awesome guide on deadlifts, but also a way to review technique and proper movement so you have the confidence you’re doing it correctly.
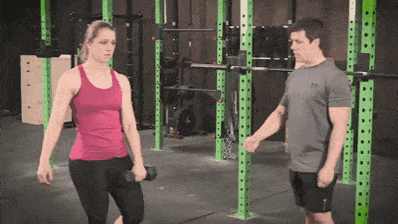
If you want an expert to check your deadlift form and help build a workout program specific to your goals, check out our 1-on-1 Online Coaching Program. Our coaching app lets you record and send a video of your movement directly to your coach who will provide specific feedback:
Setting the Bar Down (Should I drop the bar on a Deadlift?)
Okay! You got the weight off the ground and finished the movement. But now what!?
Your body should descend all at the same time, just as it ascended during the deadlift, only in reverse!
Unlock your hips and slowly move your hips backward until the bar lowers past your knees, then bend your knees and slowly lower the bar to set it down (make sure you unlock them at the same time.
Don’t unlock your knees first, as it will cause a lot of awkward movement, and possibly your lower back to round).
I REPEAT: DO NOT DO THIS:
Don’t lose tightness until you let go of the bar.
This is extremely important – a large amount of deadlift injuries come from people getting super excited about making a lift, losing tightness, and then putting the bar down wrong.
You want this to be a quick movement – lowering the deadlift slow will take a lot out of you and leave you sore for days.
Should you drop the bar during the deadlift?
The eccentric part of the deadlift (lowering it) is actually riskier than the concentric (picking it up) part of the deadlift.
Many coaches will advocate dropping your deadlift (especially with advanced athletes where they can’t afford to sacrifice performance later in the week).
In our opinion, especially if you’re training in a commercial gym, I would recommend putting the bar down (especially if you want to compete in powerlifting competitions – the lift does not count if you drop it).
So, practice putting the bar down properly. It’s just as important as practicing picking it up.
By the way, we have a massive Strength 101 Guide that you can download free when you join the Rebellion (our free community).
Get the guide when you sign up in the box below!
- Everything you need to know about getting strong.
- Workout routines for bodyweight AND weight training.
- How to find the right gym and train properly in one.
Proper Deadlift Grip, Straps, and other Equipment
Grip strength is a huge part of the deadlift. If you can’t hold on to the bar, you can’t lift it!
Here’s how to improve your grip strength quickly.
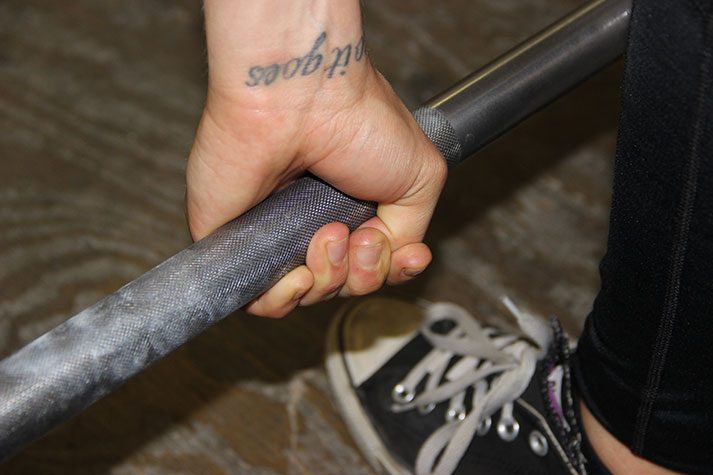
There are two main grips when it comes to the deadlift.
#1) Double overhand grip. Your palms are both facing towards your body. This is the safest grip, and the best grip for beginners to start with.
#2) Mixed Grip: One hand grabs the bar with an overhand grip, and another hand grabs the bar with an underhand grip.

The mixed grip has many disadvantages:
- It places uneven stress on your shoulders
- It can aggravate problems in the biceps on the side in which your palm is facing outwards
- It’s easier for your lift to be uneven as you’re literally gripping the bar it with uneven hands.
So why do a mixed grip?
You can physically lift more. The bar wants to roll out of your hands, so by using a mixed grip you are more likely to not have your grip fail you on a heavy lift.
As you start to lift more than your grip can handle, you can consider doing a mixed grip for your heaviest lifts, but be sure to use the double-overhand throughout your warm-up sets. Consider doing grip strength work as well.
#3) Hook grip: This grip is where you put your thumbs under your fingers.
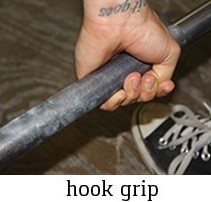
This type of grip is preferable to the mixed grip due to the fact that it doesn’t introduce any imbalances. However, it does have one major disadvantage:
It hurts like hell!
From personal experience, you get used to it and your thumbs can manage, but prepare for pain when you learn to do the hook grip!
No matter what grip you use, you’re probably going to want to invest in some chalk! It’s absolutely optional and initially won’t be incredibly useful.
However, after you start to put some weight on the bar, chalk will be enormously helpful for hanging on to the bar (I use this kind of lifting chalk). I certainly find this to be a better, smarter, and safer option than either straps or gloves.
Speaking of which…
Here are some common questions on deadlift equipment:
#1) “Should I use straps while doing deadlifts?”
Ehhh, probably not. Straps can help you lift more than your hands can hold with an overhand grip, but relying on straps could cause your grip strength to be undeveloped down the road.
You’re better off developing your grip strength alongside your deadlifts.
Short answer: consider using straps strategically when doing high-volume deadlifts, but don’t rely on regularly them for max lifts: improve your grip strength.
Instead, chalk, stronger grip strength, and a hook grip for max lifts is your friend!
#2) “Should I wear gloves while doing a deadlift, Staci?”
Nope.
Gloves actually create space between your hands and the bar, and it reduces your grip security, increases the diameter of the bar, and makes the bar harder to hold on to.
This means the gloves are doing the exact OPPOSITE of what you think they’re doing.
Use chalk instead, my friend.
I don’t recommend using gloves unless you have an injury like a ripped callus.
Speaking of ripped calluses, or if you’re worried about getting rough hands from deadlifting – make sure to take care of your hands and they are less likely to happen!
#3) “Do I need to use a lifting belt?”
When starting out, you don’t have to worry about using a belt.
However, as you get to really heavy weights, it may be something to look into.
Belts need to be worn correctly in order to be effective.
#4) “What kind of shoes should I wear to deadlift?”
GREAT question. I don’t care what kind of shoes they are, as long as they are flat.
You really have four options for deadlifting shoes:
- FLAT SHOES: Chucks work great. I personally prefer to deadlift in either socks or zero drop minimalist shoes. Do NOT wear clunky athletic shoes with thick heels or shoes with pockets of air bubbles in the heels.
- DEADLIFTING SHOES: Getting a bit fancy here, but if you are competing or just want shoes you can deadlift in, consider deadlifting shoes.
- GO BAREFOOT: If you don’t want to invest in new shoes, deadlift barefoot. Just don’t go walking around the gym in socks – you might get kicked out or have a weight roll across your feet!
- SLIPPERS: No, not fuzzy Snoopy ones. Look into deadlift slippers – they’re just fancy socks approved for competition.
Still here, eh? Amazing!
We want to be part of a community that helps you reach your goals. Whether you want to deadlift for the first time, or you’re trying to hit the 1,000 club, our Nerdy Coaches want to help.
Let us take care of everything so all you have to worry about is following the instructions and picking up the weight!
7 Common Faults and Mistakes while Deadlifting
DON’T DO THESE THINGS:
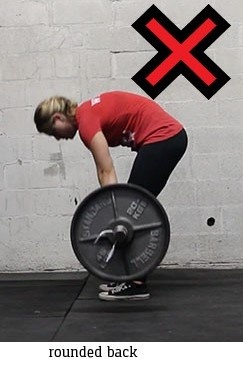
#1) Rounded Back – not keeping your spine in neutral the entire time. Letting your lower back round at all is a huge no no. [2]
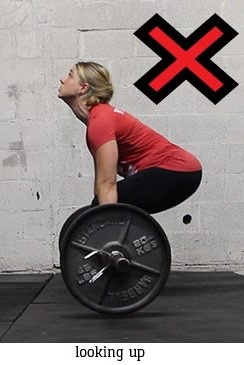
#2) Looking up (with your neck) – Along with keeping a neutral spine, hyper extending your neck to look up is also something we want to stay away from.
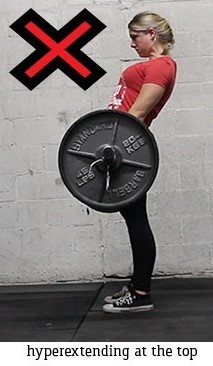
#3) Hyperextending at the end of the movement – The spine should still be in neutral even at the top. Hyper extending at the top is actually not something we actually strive for or need to do.
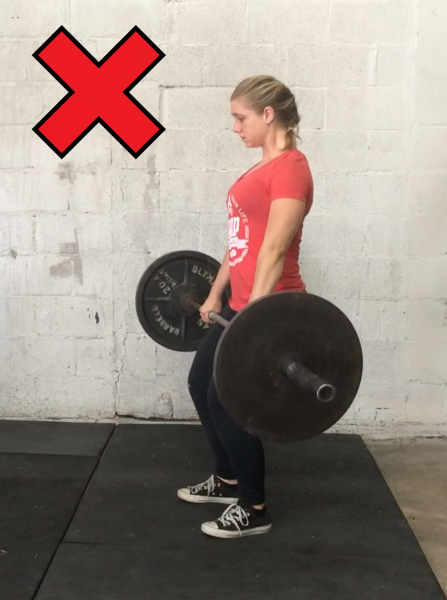
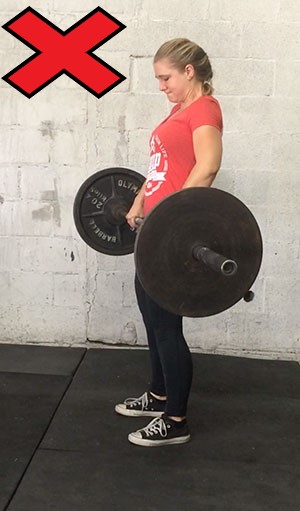
#4) Treating the deadlift like a squat with the bar in your hands. You are not starting in a squat position and standing up – it is a different movement.

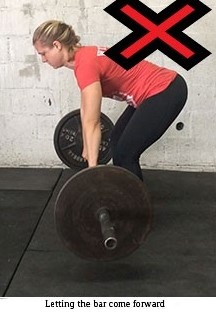
#5) Letting the bar come forward – The bar needs to stay over your midline and be dragged up your body the entire lift – any movement forward of your midline should be avoided.
#6) Butt rises faster than your chest (also known as the “stripper deadlift”) – your chest should lead the movement, and your entire body should move upward at the same pace.
#7) Bending your arms – your arms should stay straight. Don’t bend your elbows to try to get the bar up faster.
NOT SURE YOUR FORM IS RIGHT? I hear you – Personally, I deadlifted with bad form for years and I didn’t even realize it.
It wasn’t until I enlisted the help of an online coach who checked my form via video and helped me with the right “mental cues” to get me to start deadlifting correctly.
If you want somebody to check your form – AND build the workout for you – consider our 1-on-1 online coaching program with form check:
What Are the Different Types of Deadlifts?
So far we’ve addressed the conventional/traditional barbell deadlift.
There are MANY different variations of deadlifts, and you can use whichever one floats your boat (if you have a boat to float, that is).
Here are 8 different deadlift variations:
1) Conventional Deadlift – Your hands are just outside your feet, standing at about hip-width apart. Our article has been highlighting this form of deadlift.
2) Sumo Deadlift – Your hands are inside your feet with a wider stance.
3) Hex or Trap Bar Bar Deadlifts – Use a specialty bar made just for deadlifting which changes the biomechanics.

4) Snatch Grip Deadlift – Your hands will use a wide grip like in the Snatch.
5) Romanian Deadlift: Think of this as the top half of a conventional deadlift (imagine you’re a “drinking bird” bending over at the waist).
6) Deficit Deadlift: This movement increases the range of motion of your deadlift, since your feet are elevated compared to the bar.
7) Rack Pulls: Conversely, this decreases your range of motion with the deadlift, since the bar is raised higher.
8) Dumbbell Deadlift Variations: For either accessory work, or if you don’t have access to a barbell and weights.
This guide covered primarily the conventional deadlift, because it’s a great variation for beginners and an exercise you can do every week for the rest of your life.
Once you get comfy with it though, move onto others. Need more tips for strength training moves?
I would highly recommend you do 3 things:
- Pick up Starting Strength: the bible of barbell training.
- Hire a trainer to help you do the movement correctly!
- Consider working with an online coach for your workout and nutritional guidance.
Oh and don’t forget to grab our Strength Training 101: Everything You Need to Know when you sign up in the box below:
- Everything you need to know about getting strong.
- Workout routines for bodyweight AND weight training.
- How to find the right gym and train properly in one.
Frequently Asked Questions on the Deadlift
#1) “What do I do if I can’t get into the proper starting position?”
While you are getting the mobility to get into the correct starting position, you can put the bar on blocks to raise it up a few inches to help you get in the right position.
Each workout, start with the bar a little lower, until it is just on the floor.
#2) “What weight do I start deadlifting with?”
Always start with just the bar. Then progress as described in our Strength Training 101 article “How Much Weight Should I Be Lifting?”
Each week, your goal should be to lift SLIGHTLY more than last week.
That’s it. By going SLOWLY, you’re giving all of your muscles, joints, tendons, your grip, and your central nervous system a chance to level up together.
So start small. Lift more each week.
#3) “Should I do ‘touch and go’ or ‘dead stop’ if I’m doing a set of multiple reps?”
A dead stop means letting the weight settle completely on the ground before doing the next rep, while “touch and go” reps means you’re essentially bouncing the weight at the bottom of the movement and going RIGHT into the next rep.
Touch and go reps are thus easier:
- The stretch reflex where your body quickly rubber bands in the other direction.
- Locomotion: the bar is already in motion, so it’s simply easier to lift something that is already moving than it is to lift something that is completely stopped.
- Bounce: If you are at a gym that has rubber bumper plates, these plates actually will bounce a little when they hit the floor – helping you lift the weight.
HOWEVER, while “touch and go” reps are easier, they are also more dangerous. It’s easier to mess up your form if you aren’t resetting every rep and easier to get fatigued.
It is also in the eccentric (lowering) part of the “touch and go” deadlifts that most people get hurt. This is one of the most technically demanding, important lifts out there and should be treated with respect.
For that reason, resetting between every rep is preferred for general strength programs. This allows you to reset, get your form right, and get your breathing right on every rep.
Yes, If you are doing a CrossFit WOD, you might be doing touch and go for time. Awesome. You do you, boo.
#4) “Okay, I get it. Deadlifts are great! How often should I deadlift?”
I love your enthusiasm and I would never ask you to curb it, but there are some things we need to take into consideration when adding deadlifts into our program.
(Here’s how you can build your own workout routine, by the way.)
Heavy deadlifts are extremely taxing on the central nervous system.
This means your body needs more time to recover. In fact, it’s so taxing that some coaches recommend taking the deadlift out completely for their more advanced, sport-specific athletes.
Most good strength programs only deadlift once a week – and it’s lighter volume than with your squats.
Both Starting Strength and StrongLifts only include ONE set of 5 deadlifts. Meanwhile, they program 5 sets of 5 for squats.
In our Coaching Program, we add deadlifts into each person’s workout on a case-by-case basis.
Generally, it’s once per week, and we’d love to help build a program for you that has you deadlifting 400+ pounds in no time!*
*Okay it’ll definitely take longer than “no time,” but it might happen sooner than you think!
Get Out There and Deadlift: Next Steps
 I am so excited for you to start deadlifting, because it’s the ultimate physical AND mental exercise.
For people looking for the next step, we’ve built 3 options that might float your boat:
1) If you are somebody that wants to follow a tailor-made program designed around their life and goals, check out our popular 1-on-1 Online Coaching Program.
You’ll work with our certified NF instructors who will get to know you better than you know yourself, check your form, and program your workouts and nutrition for you.
2) If you want a snazzy app to teach you exactly how to start crushing deadlifts (using things you might have around the house), check out NF Journey. Our fun habit-building app helps you exercise more frequently, eat healthier, and level up your life (literally).
Try your free trial right here:


3) Download our free Strength 101 Guide, which you can get when you sign up in the box below:
- Everything you need to know about getting strong.
- Workout routines for bodyweight AND weight training.
- How to find the right gym and train properly in one.
So, as Mark Rippetoe, Starting Strength author said:
“The deadlift also serves as a way to train the mind to do things that are hard.”
If you can pick up hundreds of pounds off the ground, what else can you accomplish?
I have a big question for you:
- Are you going to start deadlifting TODAY?
- If it not today, how about TOMORROW?
Note: these are the only two acceptable answers 🙂
If you have more questions about how to fit deadlifts into your workout, please leave them in the comments below.
Big or small, what questions do you have on the deadlift?
-Staci
PS: Here are our other free articles in the Strength 101 series:
- Strength Training 101: How to Get Strong
- Strength Training 101: Beginner Strength Training Routines
- Strength Training 101: Finding the Right Gym
- Strength Training 101: How much weight should I be lifting?
- Strength Training 101: Building Muscle Quickly
- Strength Training 101: Inverted Rows
- Strength Training 101: How to Squat Properly
- Strength Training 101: The Overhead Press
###
photo/media source:[3]